Accepting online donations using Donate
The Giving module includes everything that churches and charitable organisations need to easily accept one-off and recurring donations from existing and new givers through an online user experience called Donate.
In this article
Overview of Donate and the giver user experience
Setting up Donate
Add Donate to your website
Managing recurring donation pledges
Overview of Donate and the giver user experience
Arriving at your Donate page, the giver user experience begins with entering the Amount (in the local currency of your ChurchSuite account) and selecting a Fund. Where only one active fund is set to "Show in Donate" the fund selector isn't shown. The Frequency selector is used to choose between a One-off or a selected Recurring donation frequency. You can optionally lock down a fund to just one-off donations in the fund's settings.
Depending on the payment service integrations completed, the giver can choose their giving Method - by debit/credit card (using the Stripe integration) or by direct debit bank payment (using the GoCardless integration) - both integrations support one-off and recurring donations.
For UK customers, and depending on the selected fund's settings, the giver can optionally Gift Aid their donation. The giver can also be invited to optionally increase their donation to cover the transaction fees - this option only surfaces after the giver has entered a donation amount. Where a giver has Gift-aid their donation, Gift Aid will be claimable on the increased donation amount. The giver now enters their Email address, and having ticked the privacy consent they can Proceed.

For a previously-remembered device where the giver has used Donate before, the giver is taken to the payment details stage; otherwise, a security code is sent to the giver's email address, which they'll enter into the form to confirm the giver's identity. The giver can optionally select Remember me on this device, which will save a security cookie in the giver's device browser, meaning that they won't be prompted for a security code for that email address in the future. A previously-remembered giver can also opt to no longer be remembered.

Clicking Proceed - and if the email address is matched to more than one active giver (or active Address Book contact that doesn't yet have a linked giver profile) - the giver is invited to select which person the donation is to be assigned against. In the example below, Paul and Fiona both share the same email address in ChurchSuite.

If the email address is not matched to an existing person in ChurchSuite, or if the giver selects I am not in this list, the giver is prompted to enter basic contact details and a new giver profile is created. Name, the first line of address, city and postcode/zip code fields are required. For multi-site customers, the new giver profile is added to your first site determined by the site order set in Administrator > Profile > Sites - the giver cannot select their site.

Card donations...
The giver can Edit their contact details if necessary. A giver must always have the minimum 'required' contact details and will be unable to proceed with their donation until these are provided. The donation details are summarised - the amount, frequency and fund. The giver chooses their card payment method - either Card or, depending on the device, ApplePay or Google Pay.

Direct Debit donations (Bank)
The giver can Edit their contact details if necessary. A giver must always have the minimum 'required' contact details and will be unable to proceed with their donation until these are provided. The donation details are summarised - the amount, frequency and fund. The giver clicks Proceed to GoCardless to complete the transaction, requiring them to enter their bank account sort code and account number.

A success message is displayed. For "instant payments" by card, the success message will confirm the donation has been immediately processed, and for direct debit payments, the success message will confirm the transaction is being processed by their bank. In both cases, the success page can be closed, even if the transaction is still processing. A confirmation email will be sent to the giver when the payment request has been approved and completed. Recurring donations are recorded as a pledge against the giver's profile. A confirmation email will be sent each time the pledge is processed on the appropriate 'due date'. Pledge confirmation emails contain a Manage Giving link through which the giver can self-manage their recurring donation.

Stripe fees when a giver increases their donation...

ChurchSuite is unable to determine whether your organisation's Stripe account is on its standard pricing or non-profit discounted tariff. Therefore, we assume standard pricing when calculating the transaction fees explained to the giver in Donate. However, if your organisation is on Stripe's non-profit tariff, this will lead to a difference when the transaction fee is calculated according to your actual Stripe pricing. Consider the above example, a one-off donation of £100...
Stripe's standard transaction fees are 2.5% + 20p = £2.70, so the organisation would receive £97.30. However, if your organisation is on Stripe's discounted non-profit tariff, the fees on a £100 gross donation will be calculated as 2.2%+20p = £2.40, so you'll receive £97.60.
Similarly, if the giver chooses to Cover the transaction fee, their £100 donation will be increased to £102.77, so the organisation would receive £100 after 2.5% + 20p fees. However, if your organisation is on Stripe's discounted "non-profit" tariff, the fees on an increased donation of £102.77, when calculated as 2.2% + 20p = £2.46, so you'll receive £100.31.
What happens next?
One-off donations are immediately added to the giver's profile in ChurchSuite. They can also be viewed using the Online Donations report in the Giving module's Reports section.
For recurring donations, a subscription pledge is added to the Pledges tab of the giver's profile, visually distinguished from manually-added pledges (i.e. those used to reflect standing orders and other planned giving pledges) by a "DD" or 'Card' icon in the Method column.
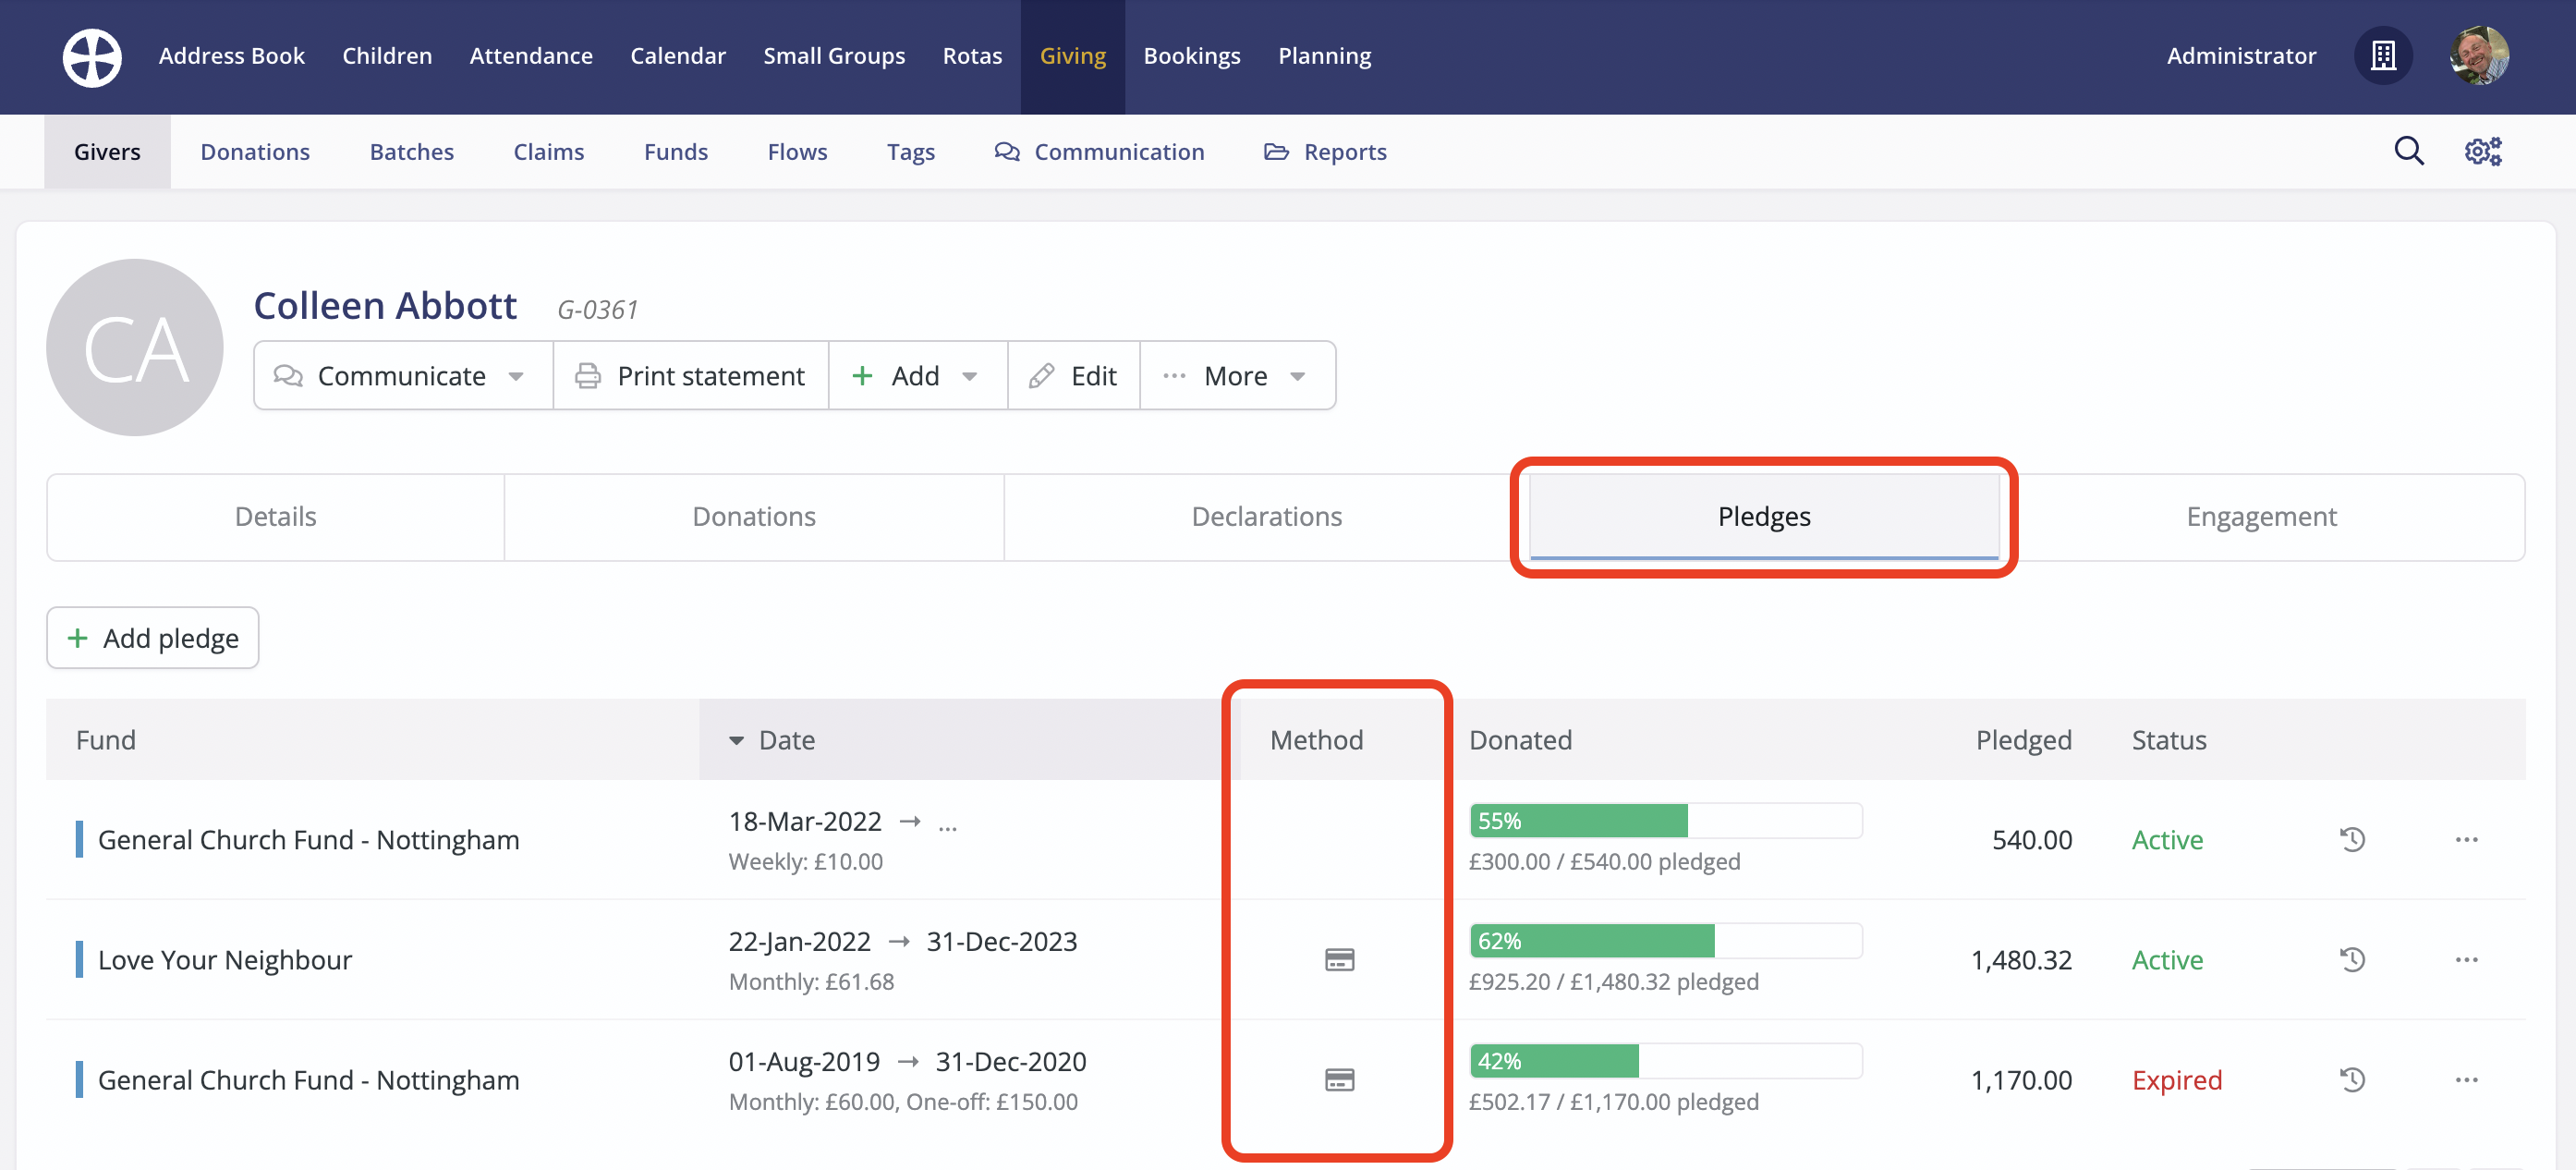
Successfully processed subscription pledge donations are automatically added to the giver's profile on each due date while the pledge is active, and the giver receives a fund confirmation email each time Stripe/GoCardless process their pledge. The confirmation email contains an embedded Manage giving button, enabling the giver to further manage their regular pledge giving, perhaps to make changes or cancel.

If Pledge Management is enabled in your Giving module's My ChurchSuite Options, a Manage option for each active pledge is provided to the giver through their My Giving section in My ChurchSuite.

For recurring Direct Debit donations, the giver can Edit the pledge amount (but not change the due date) or Cancel their pledge. If a giver wishes to change their pledge 'due date', they will need to cancel their existing pledge and set up a new pledge for the new due date.

For recurring Card donations, the giver can Edit the pledge amount or add a pledge end date, Cancel their pledge, or Change payment method to change the card used for future pledge donations. If a giver wishes to change their pledge 'due date', they will need to cancel their existing pledge and set up a new pledge for the new due date.

Giving module users can use the Online Donations and Subscriptions reports in the Giving module's Reports section to view details of online donations and subscription pledges - the reports show details of the status of online donations as they are processed by Stripe and GoCardless.

For UK customers, Gift Aided online donations are added with an Unclaimed status - Gift Aid will be claimable on those donations when you next complete a Gift Aid claim and the status will update from Unclaimed to Claimed.
For one-off online donations, a one-day digitally-signed Gift Aid declaration is created against the giver profile to cover the donation's fund and date. For recurring donations, an enduring Gift Aid declaration is created to cover the donation's fund with a start date but no end date. The declaration start date is always the date the pledge/donation is created. To reclaim Gift Aid on a giver's historic donations made in the previous four years, you will need to obtain a separate declaration to cover those earlier dated donations. Note that where an existing online giver makes a one-off donation and already has a Gift Aid declaration covering the date and fund of the donation, Donate always adds a further Gift Aid declaration, with the declaration and donation linked - this is to meet HMRC requirements of having a clear audit trail between each one-off donation and the respective donation. It also enables a giver to optionally choose not to Gift Aid online donations if they wish, even though the giver may have a pre-existing declaration that would otherwise cover the online donation date and fund.
For the giver, the donation is automatically charged to their bank account or card, and for recurring donations, donations are charged automatically on each subsequent due date. Each payment provider has its own "payout" process for depositing the donations into your organisation's designated bank account net of transaction fees - see the related Stripe and GoCardless Integration support articles for further information.
Finally, the giver will receive a confirmation email each time an online donation is processed - the confirmation email contains all the details of their donation. The confirmation email can be optionally customised on a fund-by-fund basis, perhaps adding a personal message - the donation confirmation details will be appended to the end of any custom email message you have set.

Setting up Donate
Setting up Donate is easy. The first step is to Enable Direct Debit and/or Enable credit/debit card giving - these options are available from the Givers section of your Giving module.

In both cases, you'll be taken to the respective payment provider integrations to complete the GoCardless (Direct Debit) and/or Stripe (Cards) account-opening process, which will link the respective payment provider account to your ChurchSuite account. See our related support articles for detailed guidance on completing each integration - " Integrating Stripe for online card payments" and "Integrating GoCardless for online donations".
Having completed the payment service provider integrations, head into the Giving module's settings, accessed via the cogwheels icon in the top right corner of the module. Select the Donate Options tab. At the top of the page is a link to your Donate page - you can use this URL link in communications to promote online giving. You can also add/embed the link to your Donate page on your website. Next, click to Edit each of the options in turn:

Choose the Integrations through which you would like to accept online donations. Note that only payment service integrations (Stripe, GoCardless) that are accepting live payments will be available in Donate - any payment methods that are restricted will be unavailable in Donate until the account restriction is resolved. A restriction typically happens if there is incomplete security verification on a Stripe or GoCardless account. You should liaise directly with the payment service provider to complete any outstanding verification, after which the restriction will be lifted and live payments and payouts will resume.
The Transaction Fees option enables/disables the "Ask giver to cover transaction fees" option in Donate; inviting the giver to increase their donation to cover the transaction fees. Finally, you can add a custom Success Message that will display on-screen when a giver has completed the online donation process - perhaps an opportunity to add a personalised thank you.
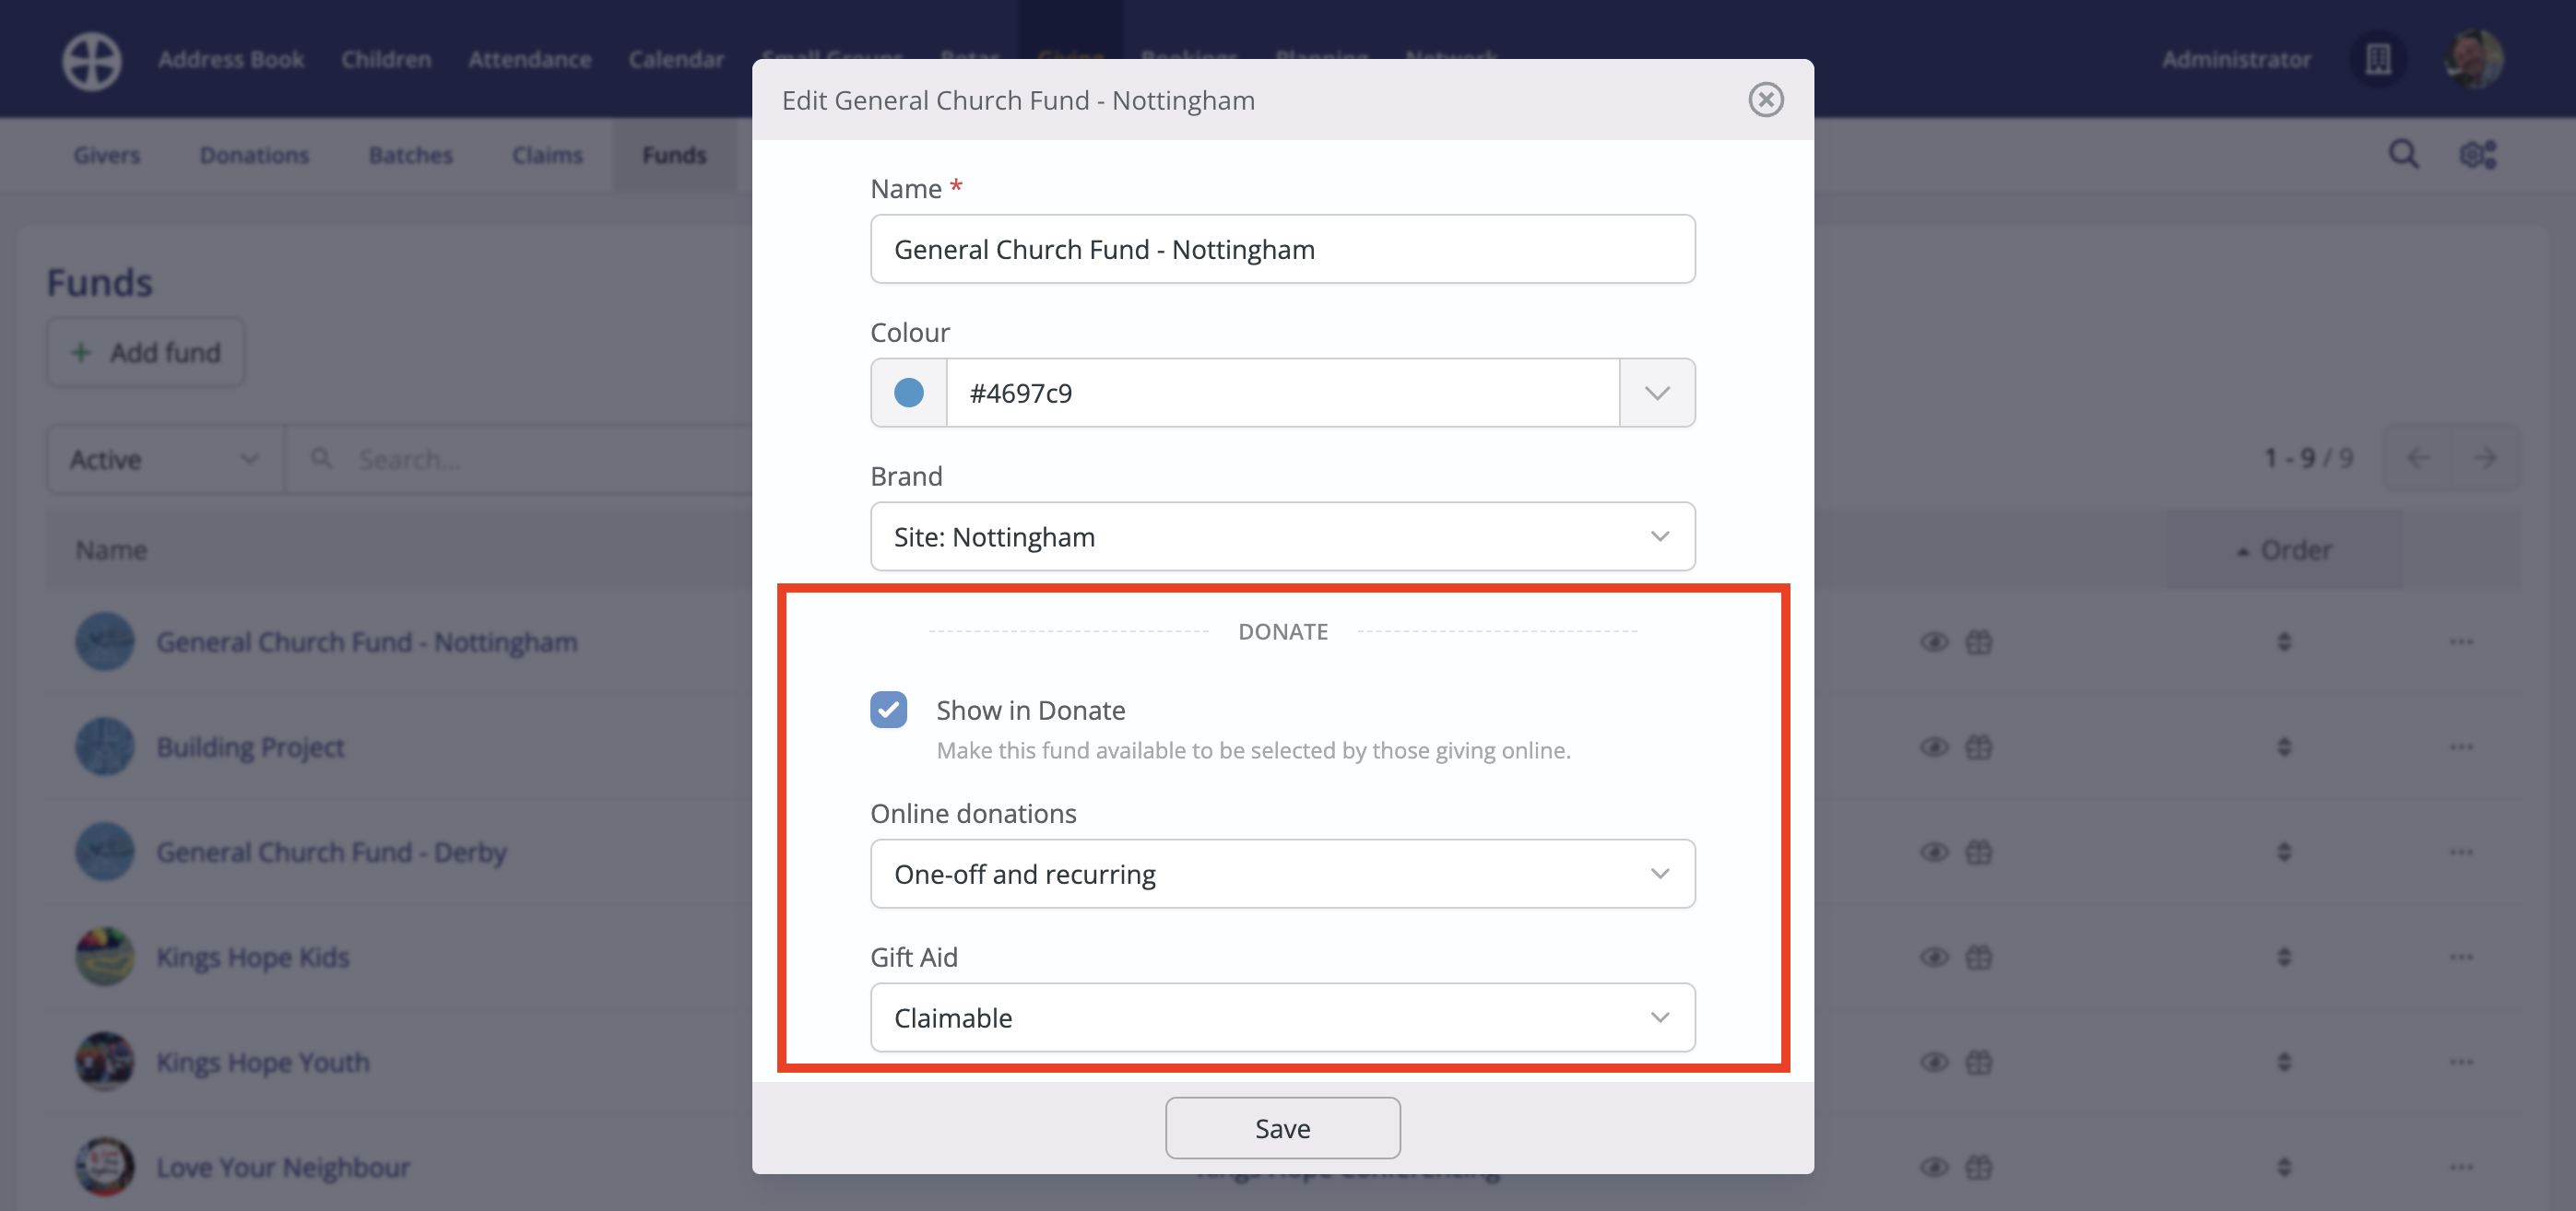
Finally, head into the Funds section of the Giving module and ensure that at least one fund is set to "Show in Donate" - distinguished by an 'eye' icon in the list of funds. Fund visibility enables you to control the funds people can give to through Donate. Note also that funds can be ordered within the list - perhaps placing your most commonly-used fund first in the list - the first fund set to show in Donate is the default fund selected in Donate.

Selecting to Edit a fund surfaces additional Donate-related settings for each fund - whether to Show [the fund] in Donate, whether the fund accepts one-off only or one-off and recurring donations; and for UK customers, whether the fund accepts 'Gift-Aided' online donations - you can optionally set a Fund as "Not claimable", which prevent givers from 'Gift Aiding" donations for that fund.
Now, all you need to do is make Donate available to your prospective givers - perhaps via a "Giving" page on your website with an embedded Donate button, or by sharing your Donate page URL in your email communications. Donate can also be accessed by your members with My ChurchSuite access from within the My Giving section - click here for further information.
Top Tip! Suggested donation amounts and frequency
Adding ?amount=X to the Donate URL or Fund Page URL will pre-populate the form with the suggested amount "X". Note that the giver can still optionally override the suggested amount if they wish.

Additionally, adding ?frequency=Y to the URL will pre-populate the form with the suggested frequency "Y" - you can use 'monthly' or 'weekly'. Using either will fill the frequency field with an appropriate result based on the date you've opened the page. For example, if you opened the link on the 28th of July 2022, which is a Thursday, the monthly day of the month suggested would be the 28th, and the weekly day of the week suggested would be a Thursday.

By adding a hyphen and then the appropriate number, you can specify the start day for the recurring donation. For example, adding ?frequency=monthly-1 to your URL will populate the form with the suggested frequency as 'Monthly - 1st'. You can do the same for a weekly frequency, with 1 equalling Monday, 2 equalling Tuesday, and so on.
Again, the giver can still optionally override the suggested frequency if they wish. Note that the Fund in question must accept 'One-off and recurring' donations for this field to surface on Donate or a Fund Page. Funds only accepting 'One-off' donations do not surface a frequency field.
You can also combine the two parameters to suggest both an amount and frequency at the same time. Simply include an & symbol in between them, for example, https://training.churchsuite.com/donate/?amount=10&frequency=weekly

Adding Donate to your website
Rather than embedding the Donate form within a page on your website (in an iFrame), we recommend you add a Donate button that opens Donate in a new browser tab - this will give the best giver user experience, especially on smaller screen devices like smartphones. Note that Apple Pay and GooglePay payment methods do not work in an iFrame.
We've prepared some ready-made "Donate" image buttons for you to use on your website. You can download them here: ChurchSuite Donate buttons library - this is a 'zip' file that you'll need to extract once downloaded. Choose the button you wish to use - there's a range of buttons in different styles, colours and currencies. Next, embed the button image into a page on your website and link the button to your Donate page URL.
Top Tip! Using a QR Code
Want to add a single Fund to your webpage? QR codes allow your potential givers to head straight to the fund page from their device, simply by scanning the fund page's unique QR code with their camera. All you need to do is access the code via the More menu:

...and then copy the image or save it to your own device - right-click on the image to access the options. Once copied, you can add it to your webpage.

Plus, you can add the QR code to your Sunday Service notice slides, paste them into your weekly email to your contacts, add them to printed publicity and use them on your Facebook page or Twitter feed - the possibilities are (almost) endless!
Managing recurring donation pledges
The Giving module's Reports section includes a selection of useful reports designed to help finance teams view and manage online donations and subscription pledges added through Donate.
If a giver has successfully set up a recurring donation (Stripe or GoCardless), their Pledge will be shown in the Subscriptions report. The Status column indicates the subscription pledge status - either Active, Future, Expired or Cancelled.
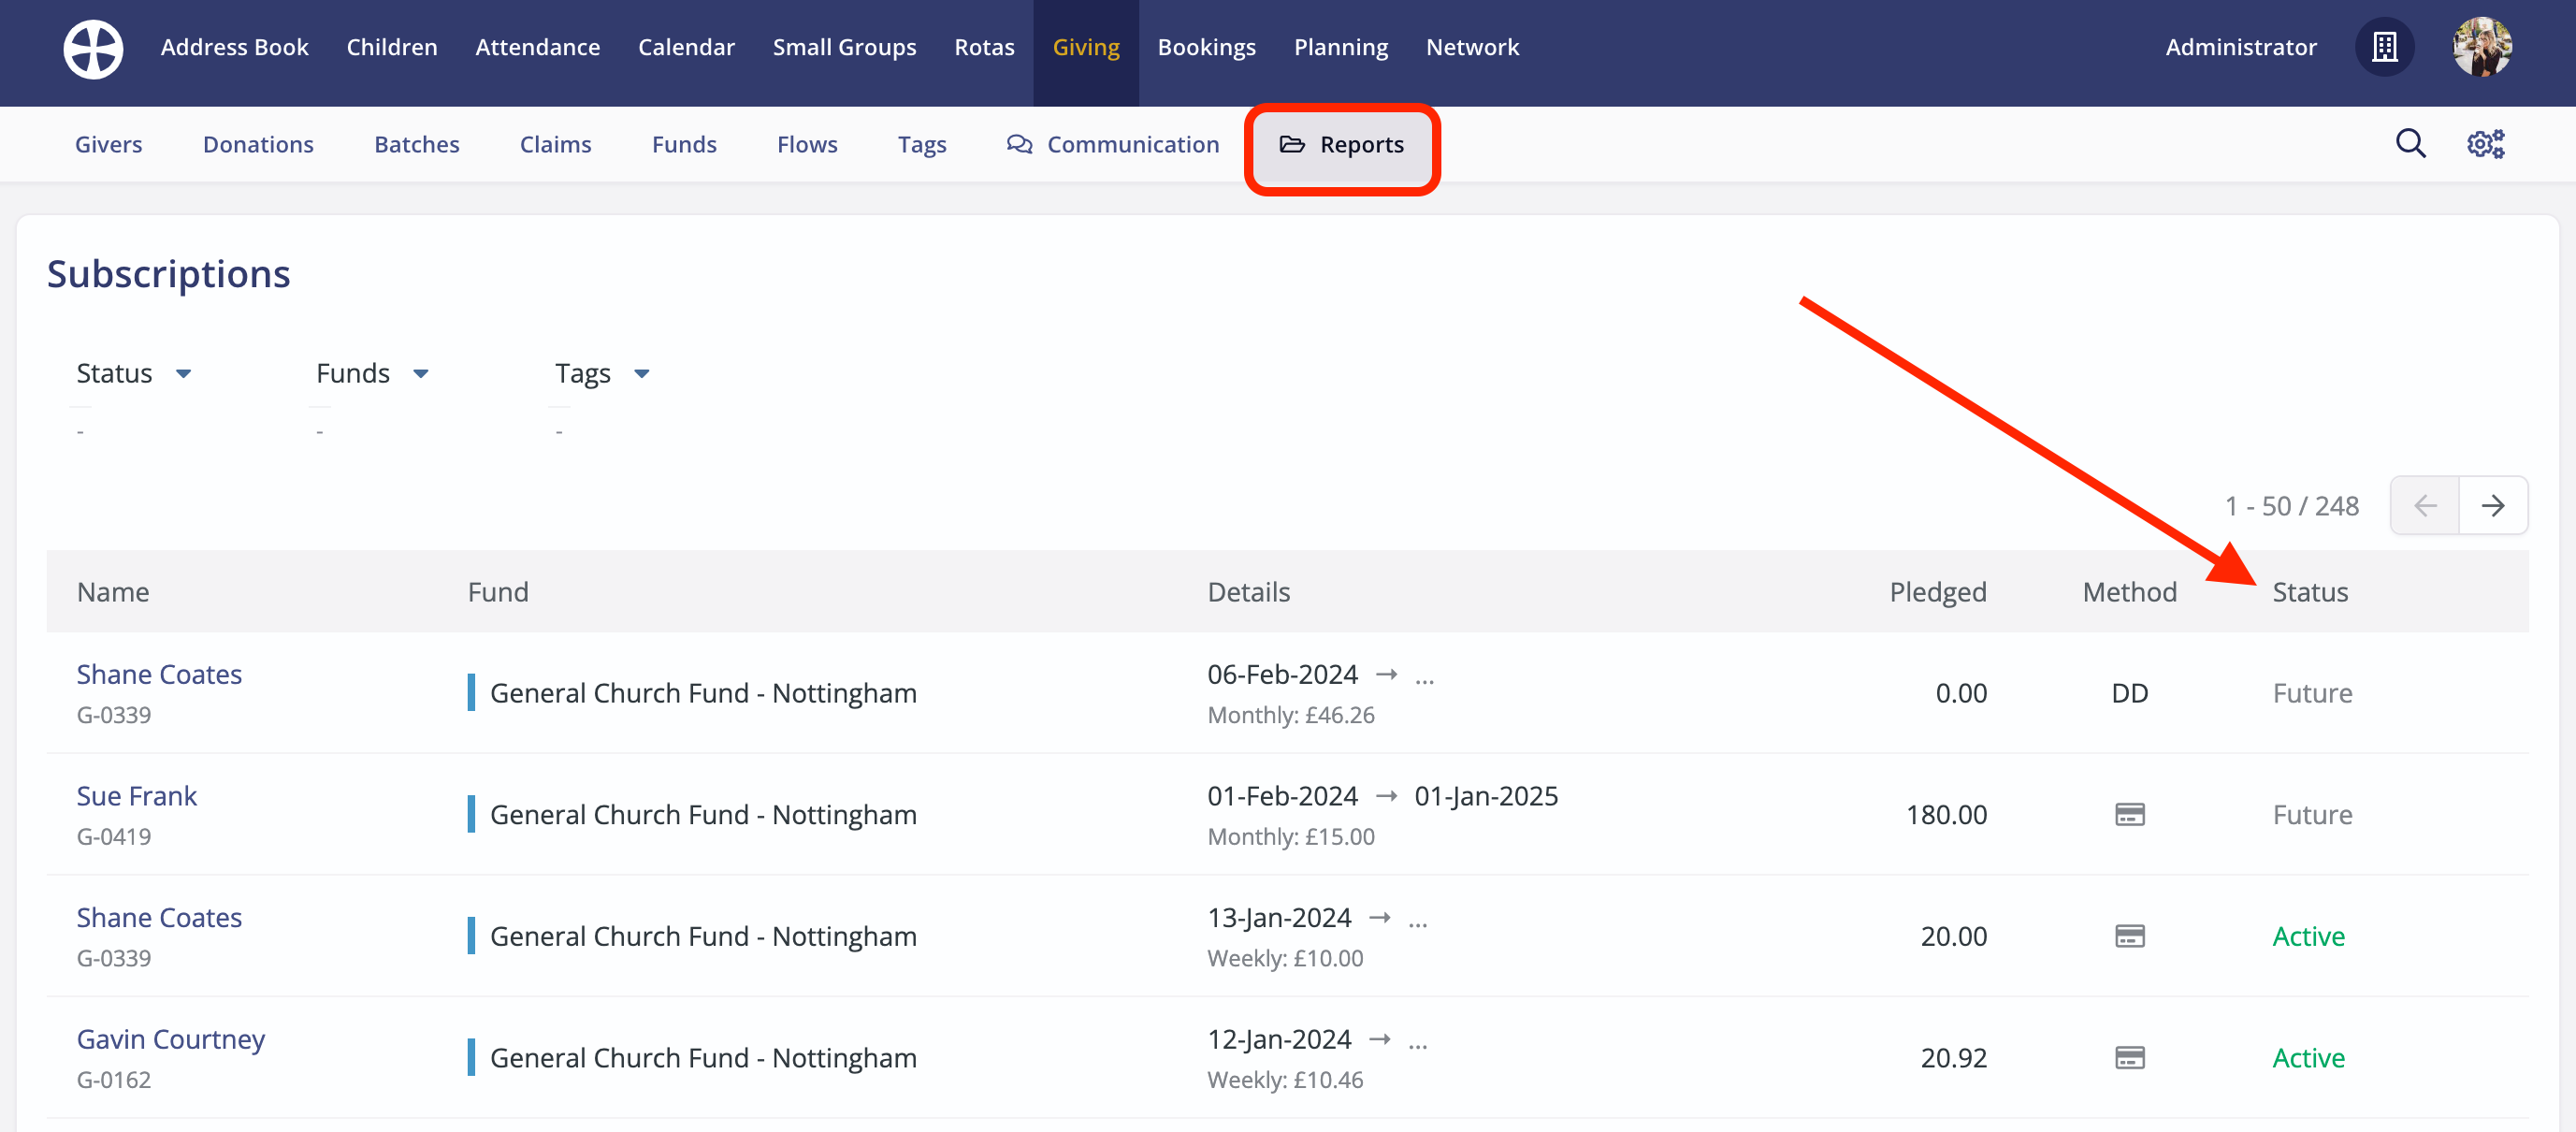
Users can also manage subscription pledges from the Pledges tab of a giver's profile. As with the Subscriptions report, a User can Edit or Cancel a giver's pledge on behalf of the giver, and with their permissions of course!

It is not possible to delete an Active subscription pledge, and neither is it possible to delete a giver that has an Active, Expired or Cancelled subscription pledge (except where there have not yet been any donations processed for the pledge). However, once a subscription pledge has Expired (where the pledge 'end date' has passed) or been Cancelled (either by a Giving module User or by the giver in My ChurchSuite), it is possible to optionally Delete pledges from a giver's profile. Deleting a pledge will remove all historic pledge progress (and pledge progress reporting) and unlink historic pledged donations from the pledge - however, the donations themselves will not be deleted. Once all subscription pledges have been deleted, it may be possible to delete the giver if retention of the giver's profile is no longer necessary - this will only be possible if there are no donations included in any Gift Aid claims (the UK only). Archiving inactive givers may be a better option.

All changes made to pledges are recorded in the Pledge Changes log (click View changes). Note that a 'pledge changes' notification email is automatically sent to the giver, and a note of the sent notification is logged in the giver's Communication log on their profile.
Troubleshooting unreceived donations
If donations are leaving the giver's bank account or card, but are not seemingly arriving in your organisation's bank account, check the following:-
- That an active subscription for the giver is shown in the above report. If not, confirm first that your GoCardless/Stripe integration has been completed successfully in Administrator > Integrations.
- If you have multiple bank accounts configured in GoCardless or Stripe, check that you are looking for the donations in the correct account!
- Check that your Stripe/GoCardless account has not been "restricted" - typically caused by incomplete account verification steps. When this happens live payments and/or payouts may be disabled until the issue is resolved with the relevant payment service provider.
- Check that you have assigned valid bank details to your Stripe or GoCardless account and that there are no outstanding account verification steps - you'll need to log in to your Stripe or GoCardless account to confirm this.
- Check that the giver has actually set up a subscription to your church or organisation, and not to somewhere else!
- If this is a giver's first donation made via GoCardless, do be aware that there's a slightly longer time between the first donation date and the date funds are processed by your bank. For further information see https://gocardless.com/direct-debit/timings/ - you'll notice that for the first donation, there are some additional days until the bank confirms the mandate, which happens before the mandate can be charged for the first time. When processing a donation with GoCardless, and since a donation can fail while the mandate is being set up, it doesn't show in ChurchSuite until GoCardless confirms it. The process is that the donation is created (instruction sent to the bank), then it's confirmed (bank confirms there are funds and it can be processed), after which it is processed (bank confirms the finds have been transferred to GoCardless) and finally paid out (GoCardless pay out the funds to your bank account). Since donations might fail when the mandate is first created (e.g. lack of funds), ChurchSuite doesn't show the donation in the Giving module until it is confirmed. You can view a full list of donations, including those that have been created but not confirmed (i.e. they could still fail) via your GoCardless account dashboard.