Adding and viewing bookings
In this article
Top tip! Customising the Bookings module user experience

Depending on the most common workflows employed by your users, the Bookings Module Options enable you to control:
- whether the booking Charges functionality is enabled or disabled for your account
- the Default planner view that Users see when they first access the module - either Day, 7-Day or 28-Day view
- whether new unlinked bookings Show on calendar by default
- whether new bookings are Linked to an event or Not linked to an event (i.e. a standalone booking) by default - ideal if most of your bookings are external bookings that are not linked to your organisation's Calendar events
- the default Status of new bookings - either "confirmed" or "pending". So, if new bookings require an approval process, you might set the default status to Pending and then, once approved, bookings can be set as Confirmed
Adding a booking
There are two places in the Bookings module where you can add bookings. The first is through the Planner, which displays resource bookings visually in a helpful Day, 7-Day or 28-Day view. Here you can click Add booking at the top of the Planner or, in the 28-Day view, hover your cursor over a date and click + Add booking to add a booking for that date.

You can also add bookings from the Bookings section of the module. This section displays all your bookings in a simple, searchable list. Filter options enable you to view past or future bookings, filter by booking status, filter by keyword or, using Advanced Search, filter by Date range or booking Type. To add a new booking, click Add booking.

Whichever 'Add' method you choose, the same Add booking pop-up opens, which will take you through the process of first adding the booking details and then adding resources. It may be helpful to remember that booked resources can be different dates and times to the booking - for example, a Saturday wedding may have booked resources for a Friday rehearsal as well as the Saturday ceremony. Booked resource times may also include additional set up and set down time beyond the booking times. The Planner shows booked resource dates and times, regardless of the booking's dates/times.
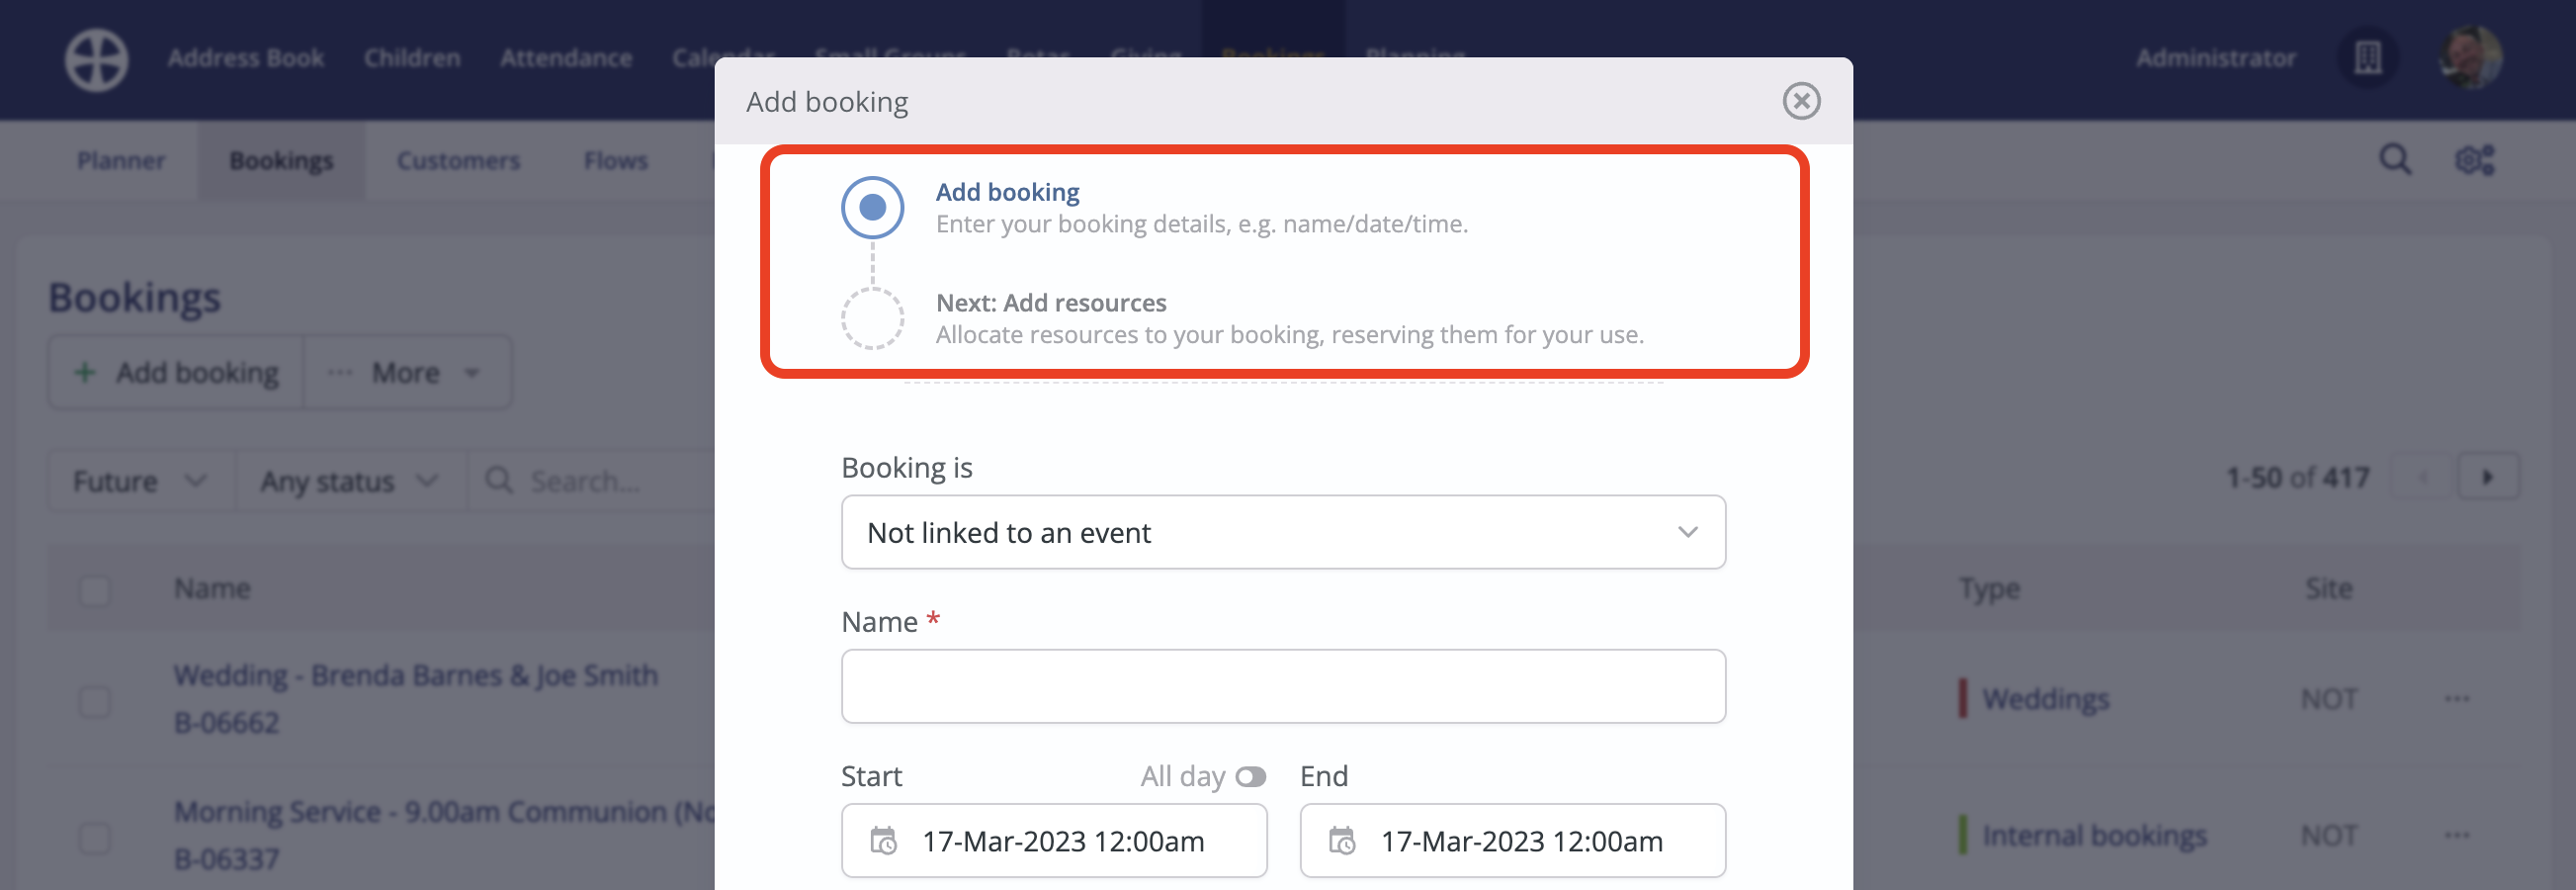
Let's work through the Add booking pop-up fields in turn. Begin by selecting whether the booking is Linked to an event or Not linked to an event. In this way, you can link internal bookings to existing events in your Calendar module, or you can add them as unlinked bookings, perhaps for external events where customers are booking your resources. Both are illustrated below...
Note that adding linked bookings can also be done from within the Calendar module - the Add booking action located on the event's "View" page enables you to quickly add linked bookings for individual and sequence events in one simple process.

If the Booking is Linked to an event...
Search and select the Event name. Matching results are suggested as you type in the Event Search.

If the selected Event belongs to a multi-date sequence, ChurchSuite will give you the option to add linked bookings for all the other future event dates in the sequence (i.e. future event dates from today's date); however, you can deselect any sequence dates you don't wish to add bookings for.

The event details, including each booking's start and end times, are auto-populated into the pop-up ready for you to continue adding further booking-related details and assigning resources.
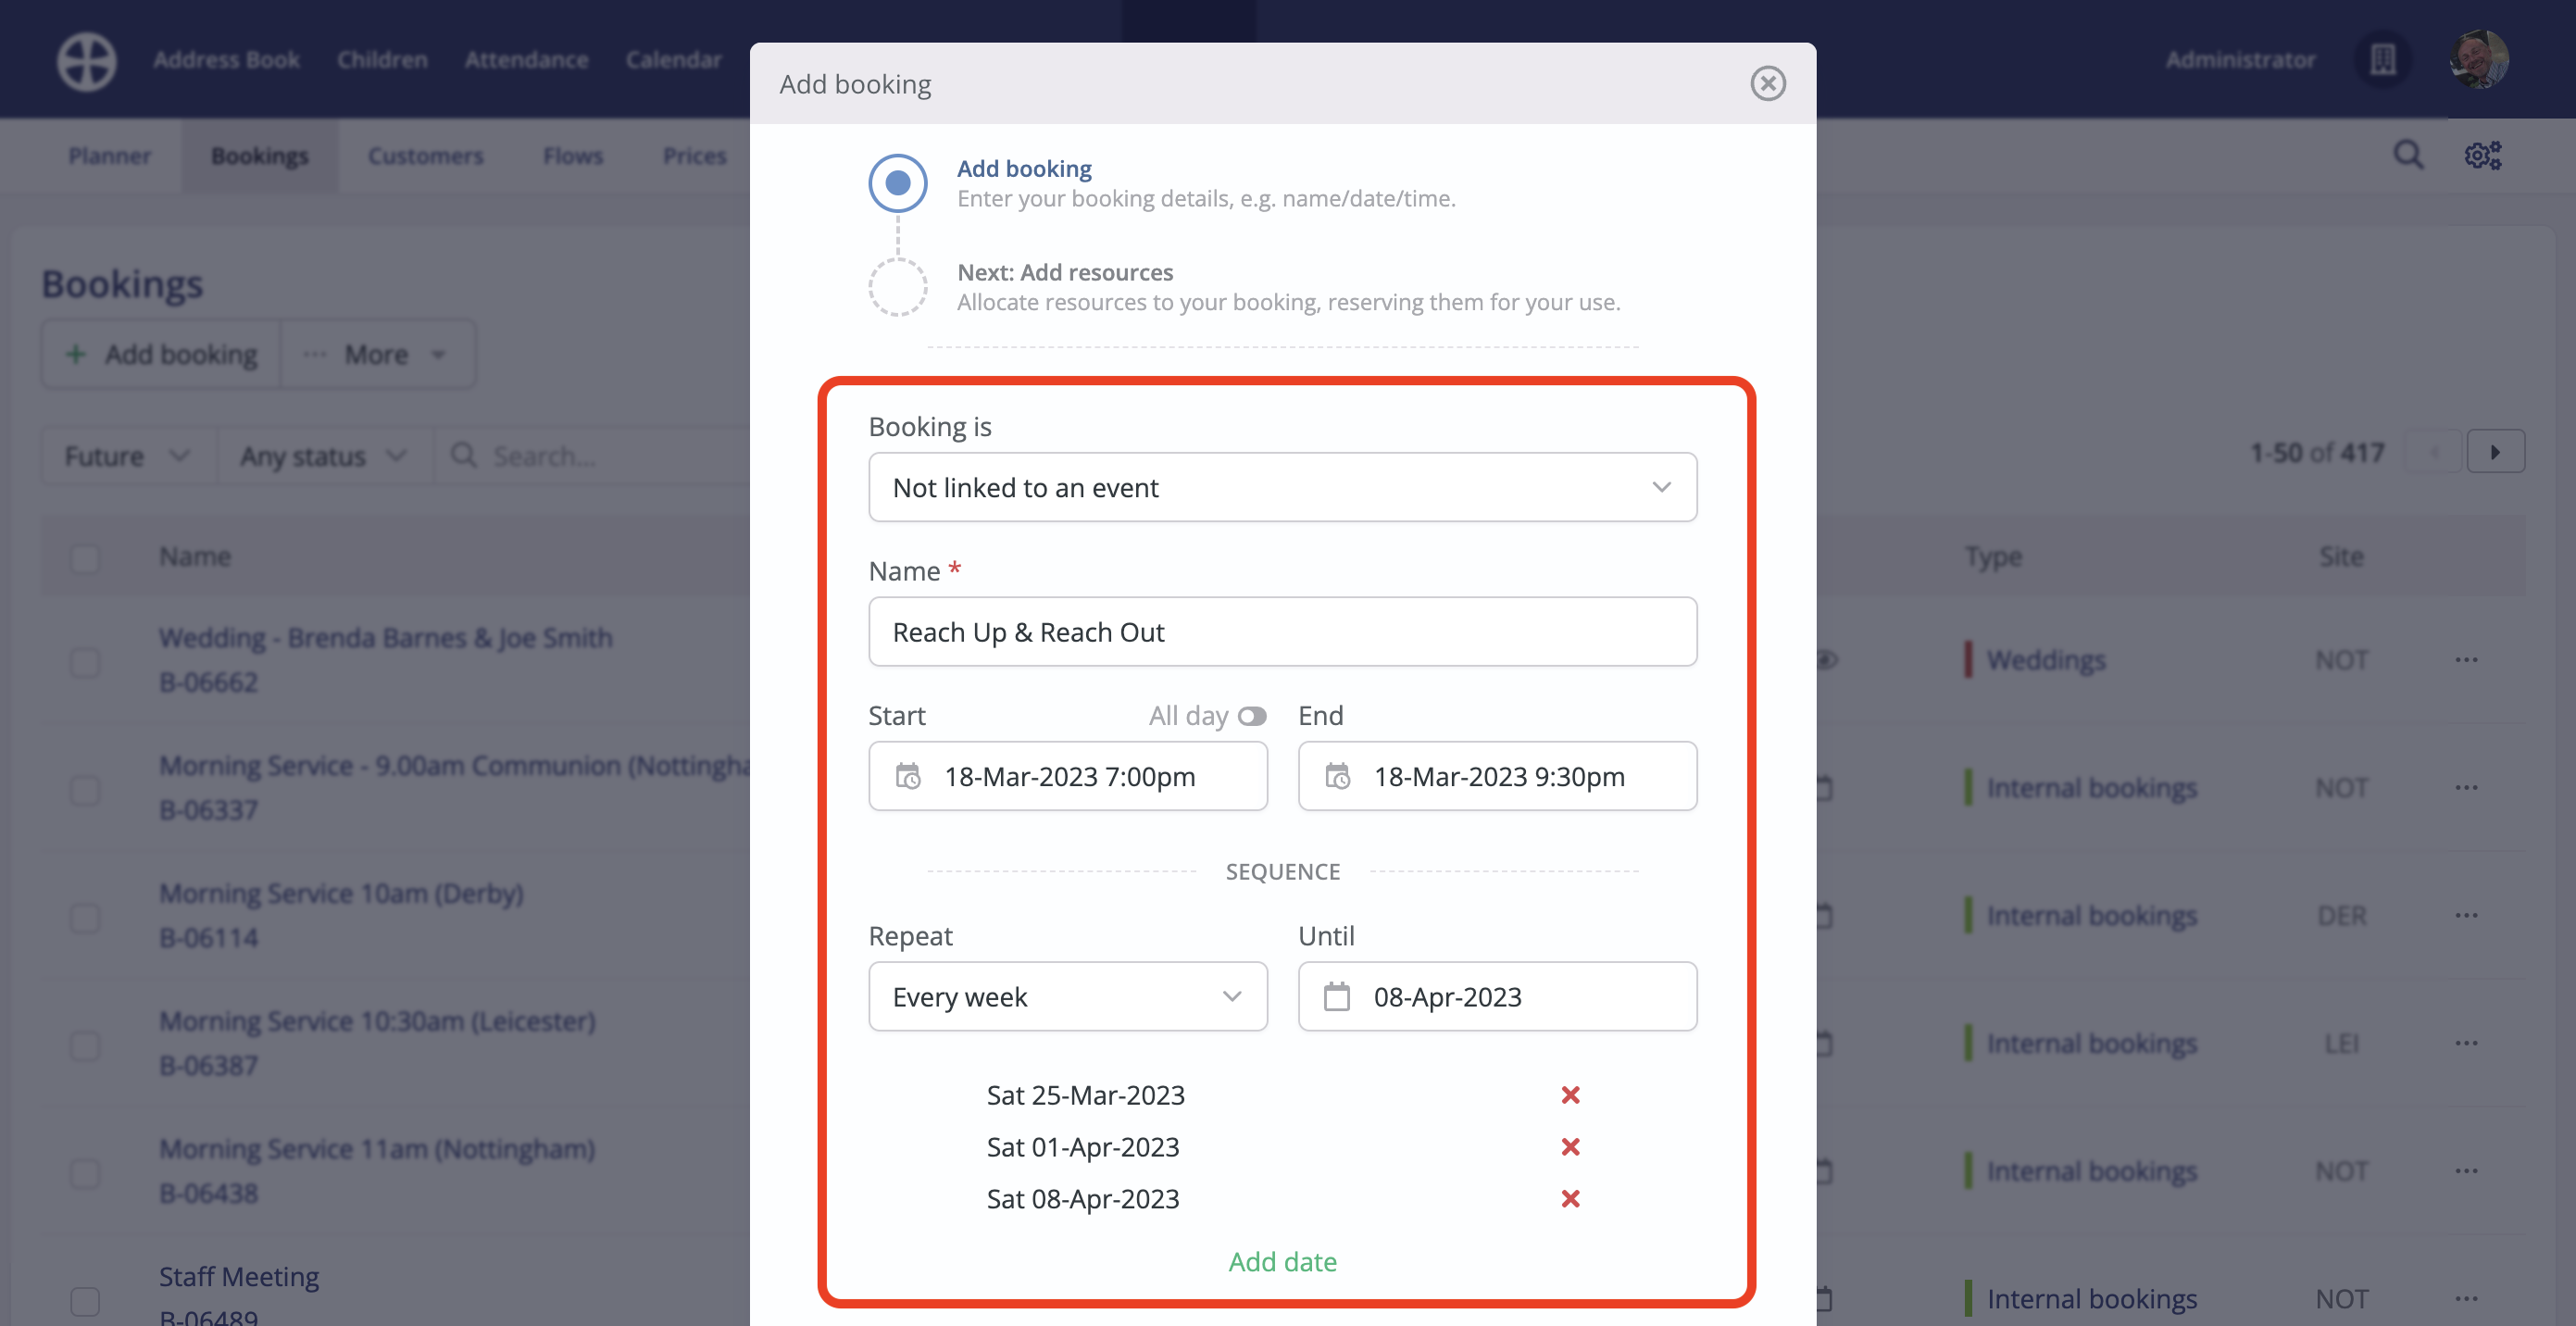
If the Booking is Not linked to an event...
Add the booking Name (required). Add the booking Start and End date/time. For a multi-date sequence, select the Repeat frequency and repeat Until date - a list of sequence dates is generated, but you can optionally click X to remove any unwanted dates within the sequence. You can use the Add date option to build sequences of ad hoc dates.
Continuing down the pop-up, set the booking's Status. For bookings not linked to an event only, there is the option to Show on calendar, which will surface the booking on your Calendar module calendar - ideal if Planner access is restricted but you still want Calendar module users to see pertinent external bookings amid your organisation's events. For multi-site customers, choose the booking Site, which determines which site's resources and customers can be assigned to the booking - a booking is always site-specific.

Optionally search for and select the Customer - the list of matching Bookings module customers (for the booking's Site) auto-filters as you type. Or click Add customer to be taken through to the 'add customer' form - you'll be returned to your booking when the new customer has been added. See the related support article on Managing booking customers for further information.

Next, select the booking Type - see the related support article for further information on Adding booking types and resources. Subject to your Bookings module settings, tick Enable payment if you wish to enable the customer to pay their booking charges online - see the related support article for further information on Booking charges. Finally, add responses to any type-specific Questions listed. Click Save to complete the process and add the new booking/sequence.

The booking (or booking sequence) is added and the booking's 'view' page is shown. The Add resource pop-up will open automatically - continued in the next section.

Adding resources
Having added the booking, you now need to add one or more resources to the booking. Typically, resources might be rooms but resources can also include key personnel, like a "Minister" for a wedding or funeral, or items of equipment. Remember, the Planner shows booked resources - a booking won't show on the Planner until resources are added. The Bookings section shows a yellow warning for bookings that have no resources assigned or you can use the No Resources report to identify bookings without assigned resources.

If you've just added a new booking, the Add resources pop-up opens automatically when the booking details are saved. However, you can also add resources to an existing booking by clicking Add resource.

On the Add resource pop-up, select the appropriate Resources - only resources belonging to the booking's Site and 'All sites' resources will be listed. The resource Start and End date/times default to those of the booking but you can optionally change these if you wish to factor in set up and set down time. Notice how the pictorial Gantt chart distinguishes the booking times in a darker colour, with any additional time on either side of the booking shown in a lighter colour. The resource colour - green in this example - is derived from the colour specified in the Resource's settings.

Any date/time Clashes (or clashes caused by exceeding a resource's available quantity) are detected and shown within the pop-up - the ability to Save the pop-up with clashing resources is determined by the Clash Approval setting in the module's settings - either 'Just Admin users' or 'Users with Write permission'. Clicking Save will add the selected resource/s to the booking and approve the clashes.

For sequence bookings, note the option to Add to sequence, which will add the selected resource/s to other selected dates in the sequence. Any clashes arising on other sequence dates will be shown and clashing sequence dates will be unticked but can be ticked to accept the clashes if required. Subject to your 'clash approval' permissions, you'll be able to approve the clashes and Save the selected resources against the ticked sequence dates.

The resources are added and the booking's View page shows a pictorial Gantt chart view of resource usage. In the example below, the booking's use of the Church clashes with a Worship booking (resources with clashes are distinguished in yellow). Clicking on the clashing resource expands the Gantt chart to show the clash pictorially. Note the resource Actions to Edit or Remove booked resources - perhaps to change to a different room/resource that is available. When using either of these two actions for a sequence resource, note the option to Update sequence (for Edit) or Remove from the sequence (for Remove). Alternatively, you can apply the change to just the one booking being viewed.

Click Add resource to add further resources to the booking. Note also the resource batch Actions to Edit or Remove multiple selected resources related to this booking - these actions only apply to the booking being viewed - it's not possible to batch Edit or batch Remove multiple selected resources across a sequence but you can Edit or Remove each resource in turn and apply the changes to the sequence.

For example, the batch Edit Actions enable you to quickly bulk-change the Start/End dates/times of multiple selected resources in one process. However, these changes can only be made on a resource-by-resource basis if the change is to be applied to other dates in the sequence.

As we come to the end of this section on adding bookings and resources, note the actions available at the top of the booking's 'view' page. You are able to Communicate with the customer (including sending the customer their booking page):

You are able to Add a plan for the booking and, if the booking is currently unlinked to an event, add an event for the booking:

You are able to Edit the booking's details or Go to booking page to view the customer-facing booking page or use one of the More actions. Note that editing a booking will only apply the changes to the current booking. To make changes that are to be applied to other dates in the same sequence, use the batch Actions on the Sequence tab.

For sequence bookings, note the Sequence tab. From here you can quickly navigate through to Future (or Past) booking dates within the same sequence, or Add to sequence to add further bookings to the same sequence. The list includes batch Actions to Edit or Delete selected bookings in the sequence.

Booking references
ChurchSuite assigns a unique, consecutively-numbered Reference to each booking added. For multi-date sequence bookings, the same reference is assigned to all bookings in the sequence.

Clicking on a booking reference (shown above) will open a filtered list of all the bookings in the sequence for that reference - showing Future bookings by default but you can switch to view Past bookings too. The booking Reference is fully searchable when used in the Search bar.
The resource Planner
The Bookings module's Planner provides a powerful, pictorial presentation of the resource usage (for the Site/s being viewed - multi-site customers only). You can switch between Day, 7 days and 28 days views and further Filter the Planner by booking Types and Resources (resource categories) to visualise bookings of interest.

In Day view a real-time timeline moves across the Planner, giving you a visual indicator of where you're at with your bookings for the day.

Navigate dates and date ranges in each view using the Planner controls, moving forwards or backwards one day or date range at a time, or click Today to refocus on today's bookings. The date picker can be used to focus the Planner on a selected date in the future or the past and, if you navigate away from the Planner - perhaps to work on a booking or move into another module - your last visited Planner view is retained in your browser, so you can pick up in the Planner where you left off.

While the Planner shows resource usage in pictorial form, the Bookings section of the module presents your bookings in a searchable list. Use the Search and Advanced Search to find just the matching bookings of interest. Notice the filters to select between viewing Future or Past bookings and filtering by booking Status - Any status (default), Pending, Confirmed or Cancelled. From the list, you can click through to the booking and see the resources assigned to the booking.
