Adding events
You can easily add or import events to populate your Calendar module and keep it up to date. This article explains how to add events - see the related support article for instructions on Importing events to the Calendar module.
In this article
Adding an event
Duplicating an event
Enabling event sign-up
Customising the sign-up confirmation email
Assigning event overseers
Keeping track of the changes
Promoting events on social media
Communicating with event sign-ups
Adding an event
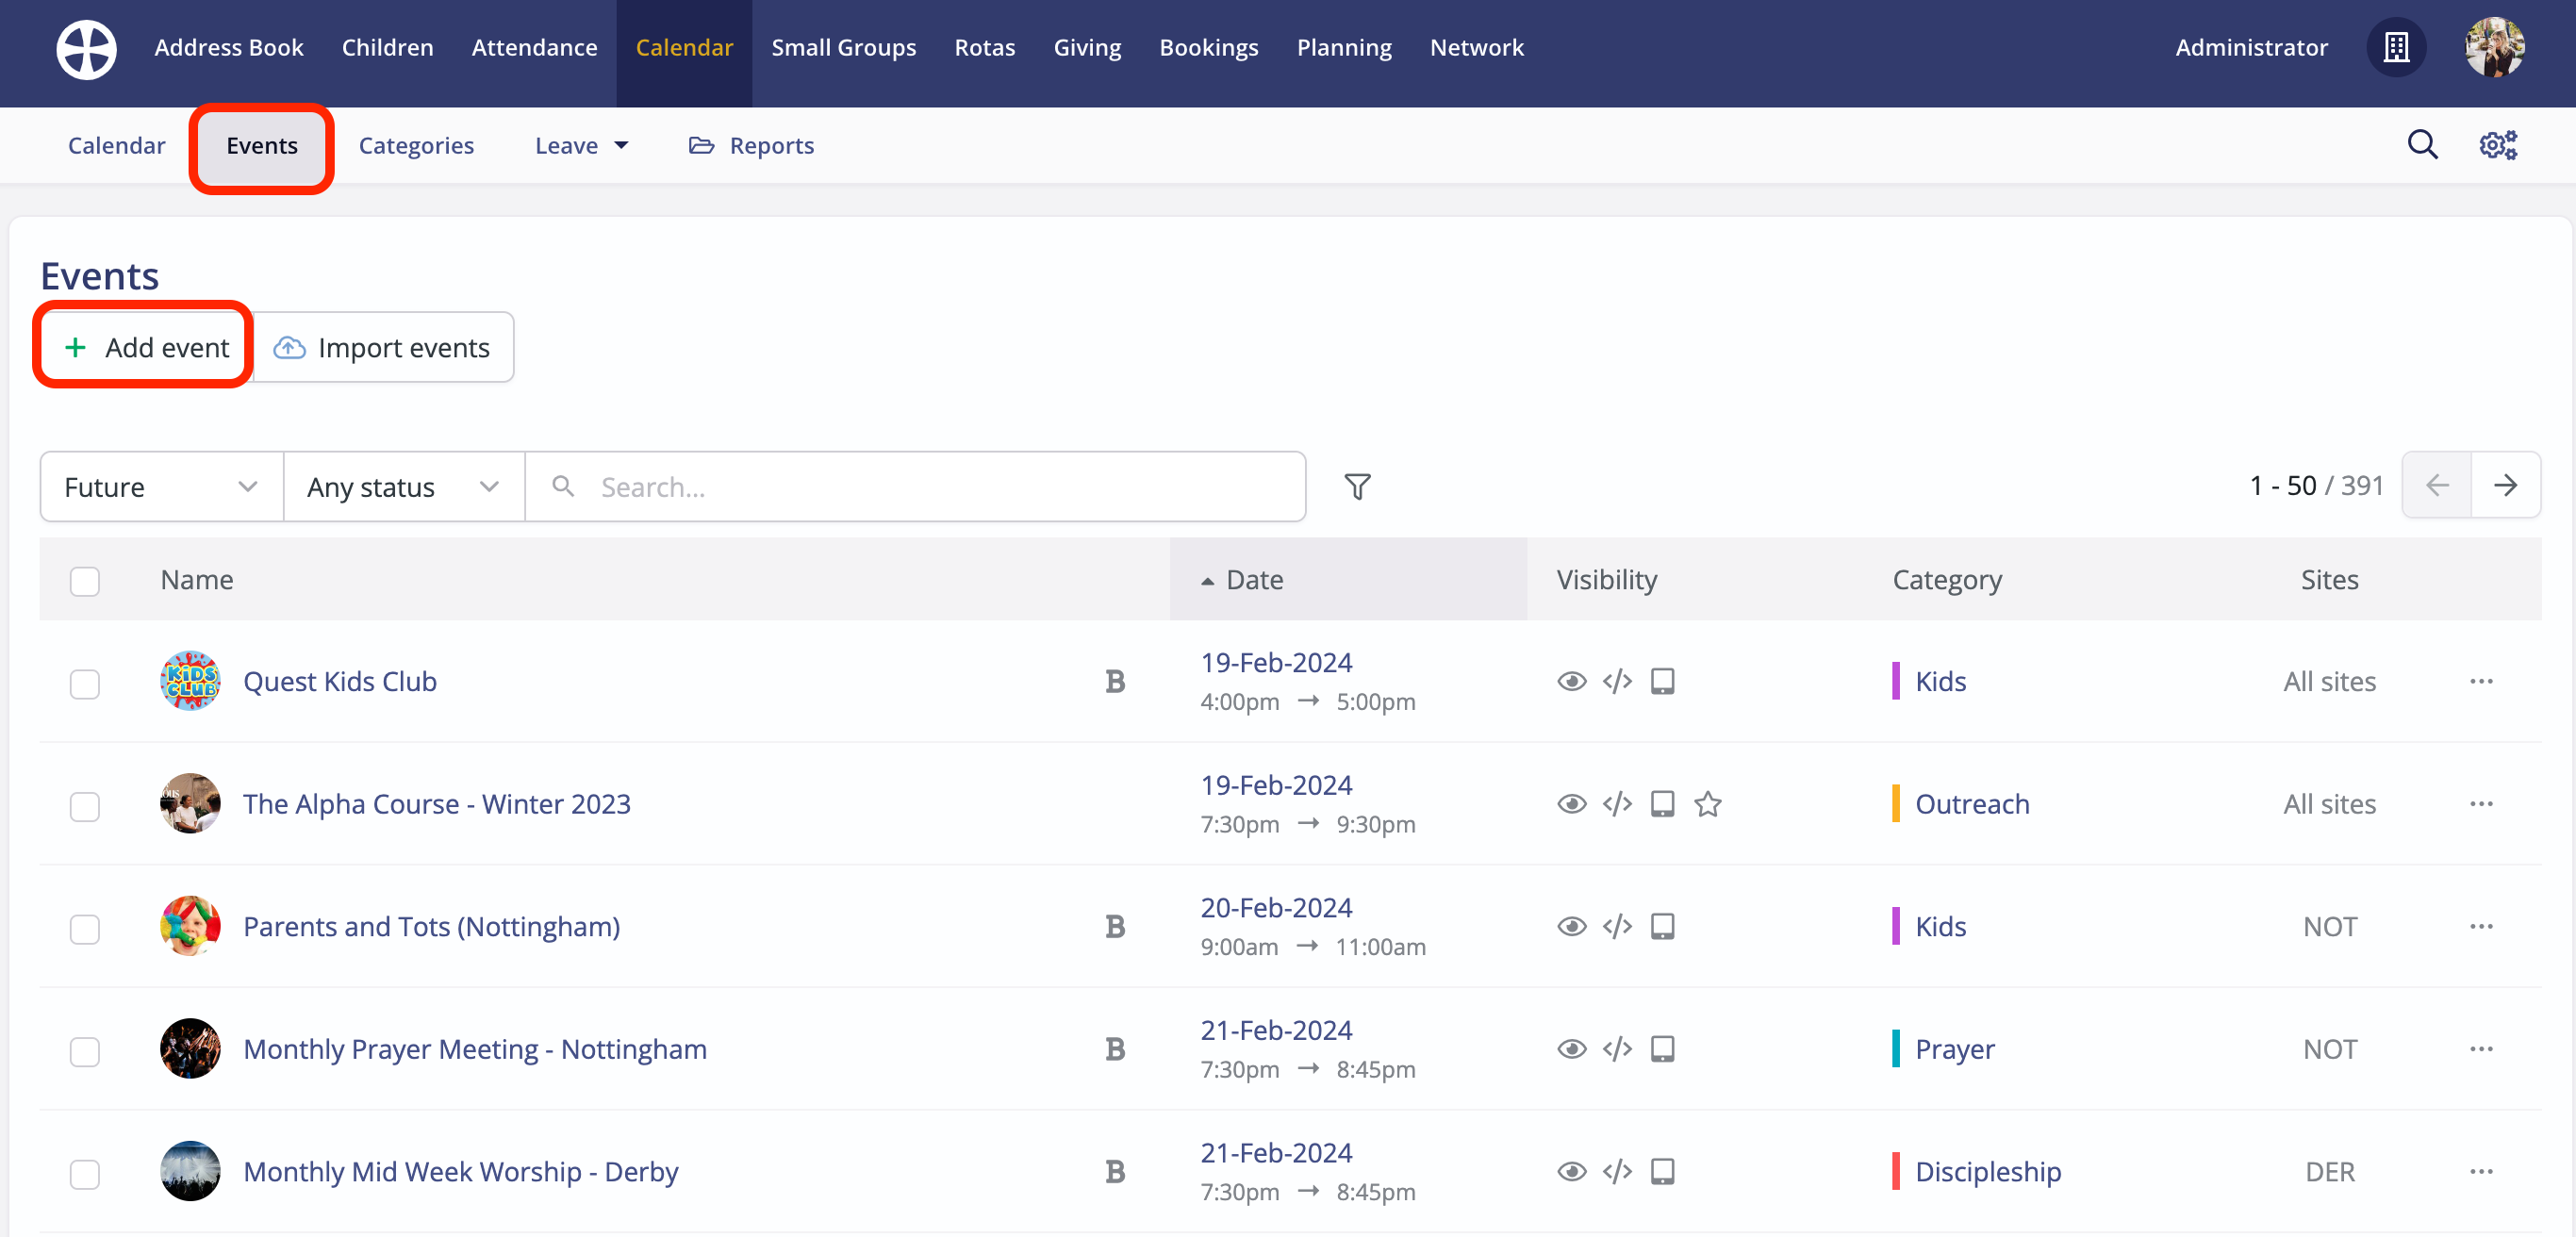
From the Events section of the Calendar module click Add event.
On the Add event pop-up, complete all of the event details as appropriate. Give your event a suitable Name. Set the event's Start date and time and End date and time. Typically, most events will likely start and end on the same date but you can also create events that run over multiple consecutive dates between the Start and End date - for example, a weekend conference running from Friday evening to Sunday afternoon. These fields should not be confused with the Event repeats option (explained below), which is used to determine if the event being added is a sequence. Note that moving the All Day slider to the right - ie, setting the event to be an all-day event - will remove the start and end times. The Location fields are used to plot the event's location on the event page map. Multi-site customers can select the event's Sites (or 'All sites'). An event must be assigned to a Category - see the related support article for adding additional event categories. Set the event Status as appropriate.
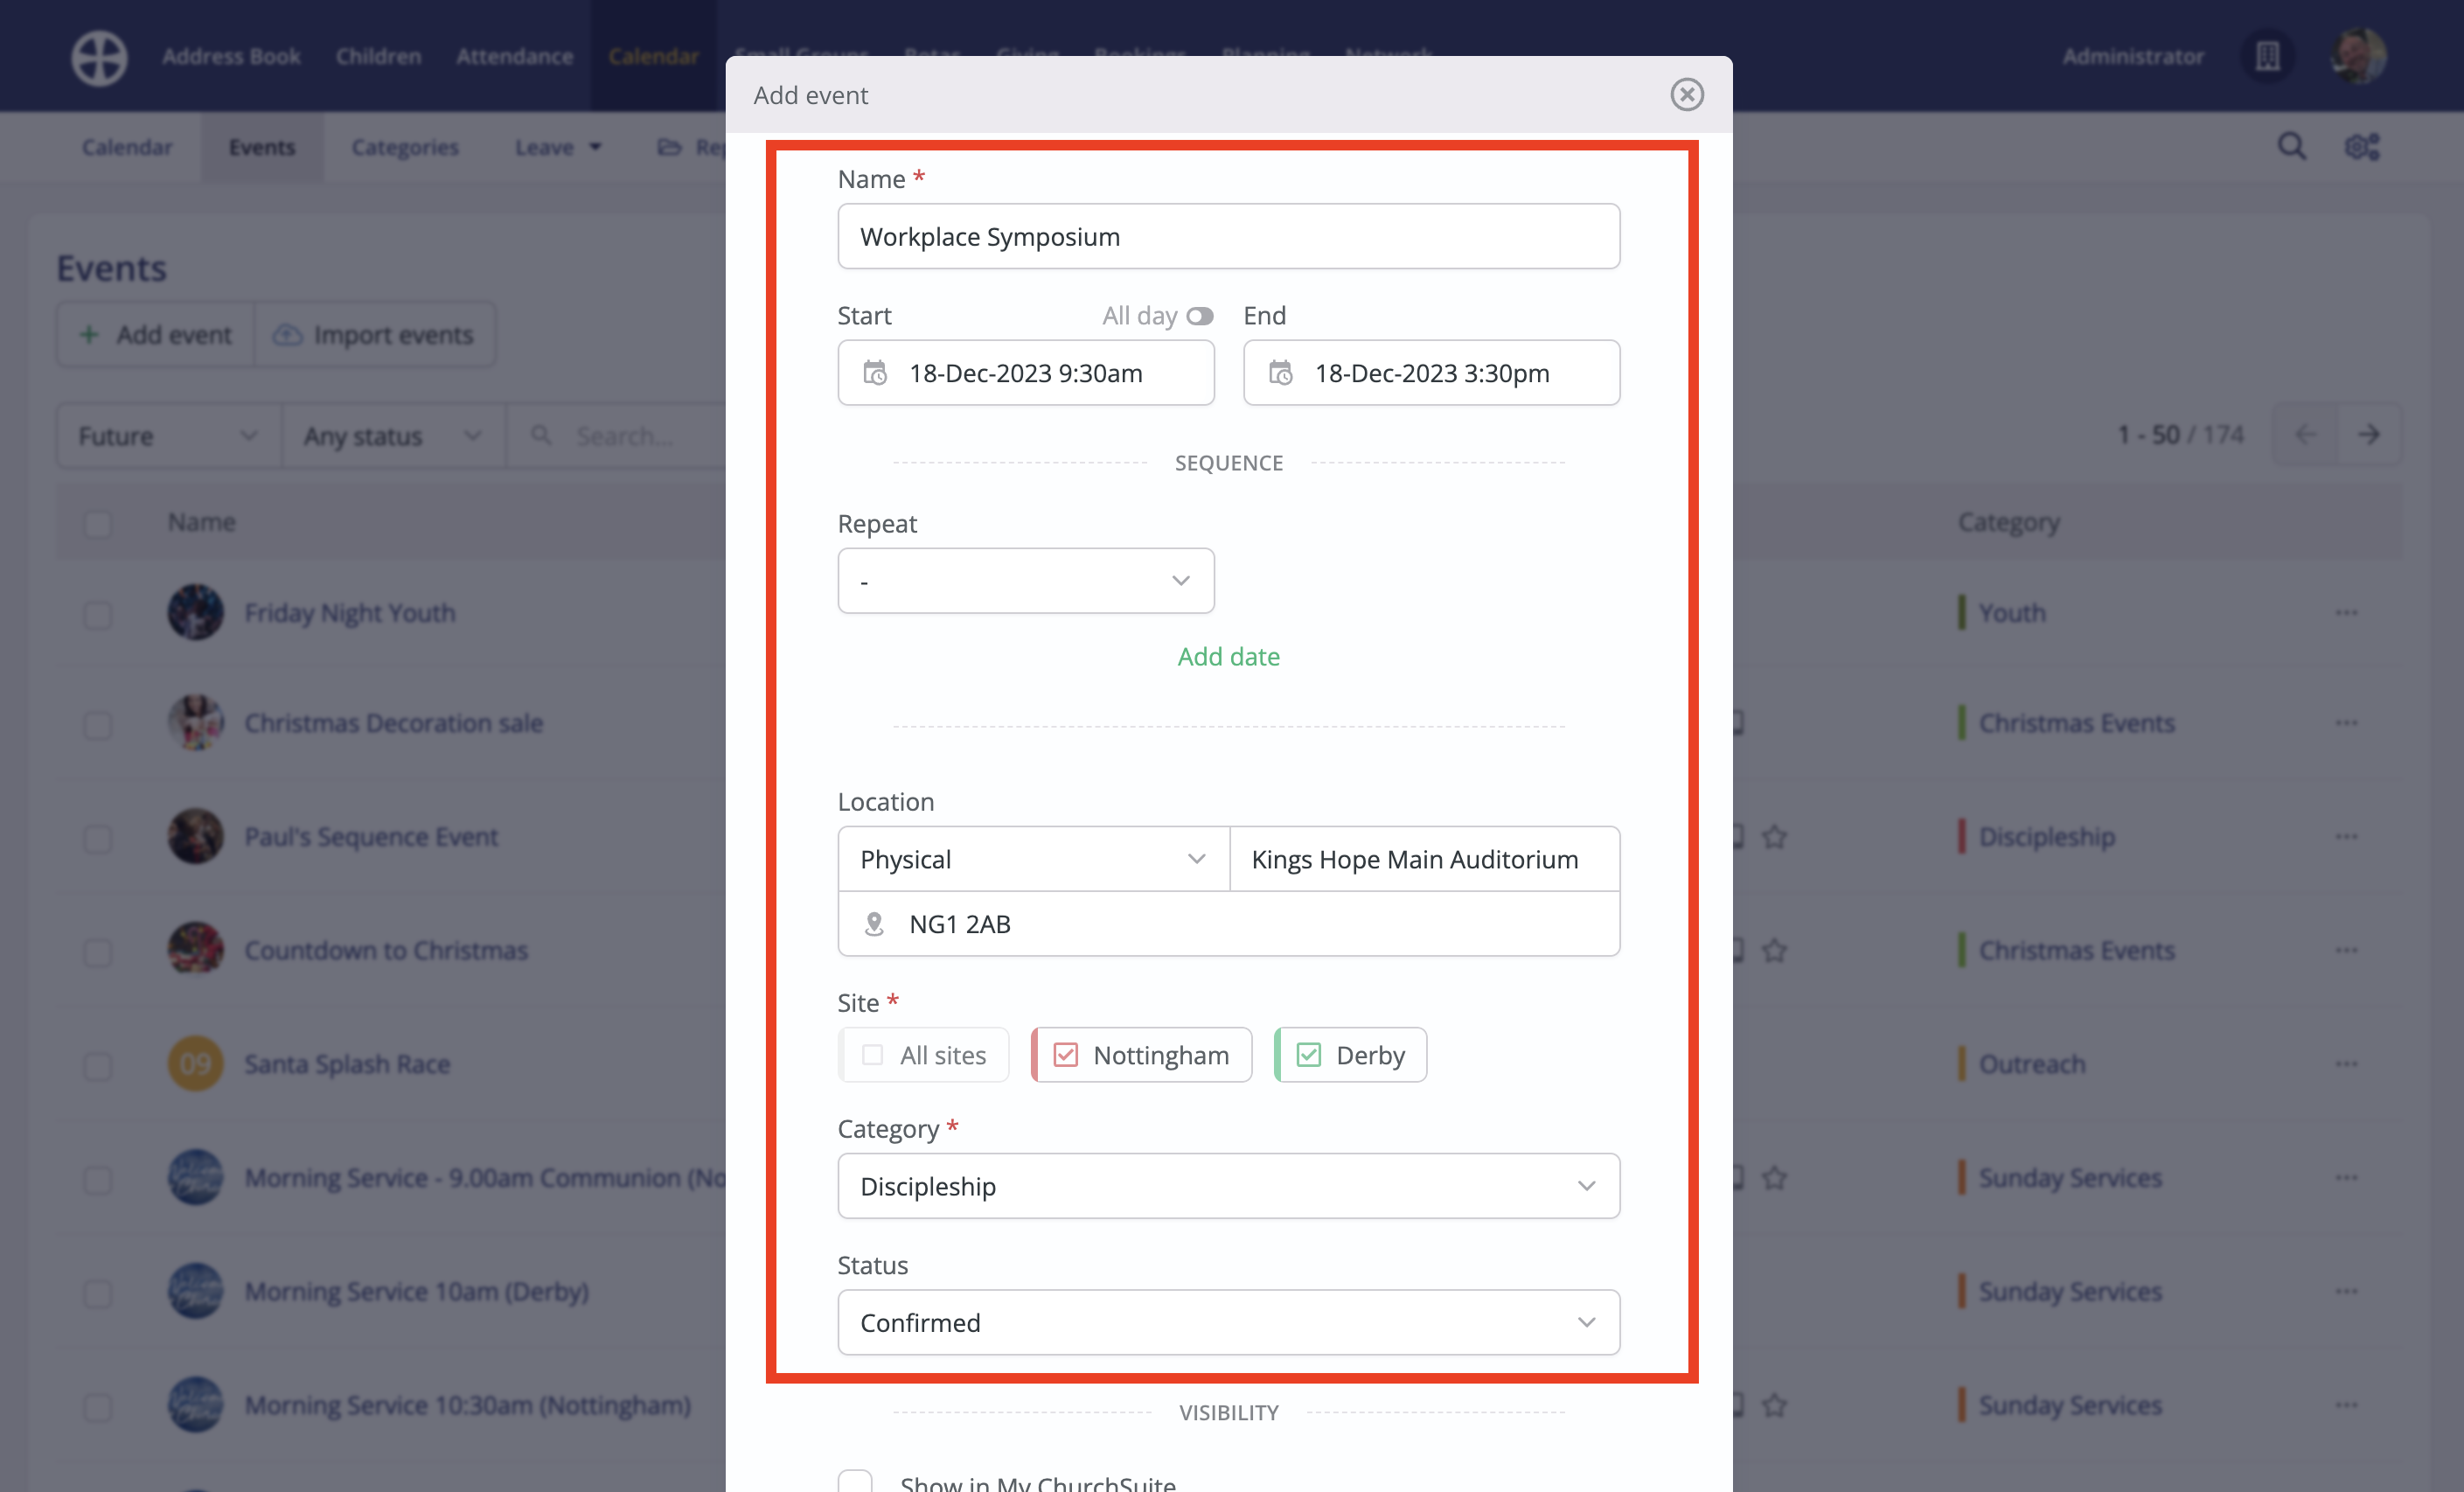
When an Event repeats - known as a Sequence - use the Repeat and Until settings to generate the sequence dates - the sequence will run from the event Start/End date and Repeat with the selected frequency until the Until date. A sequence always has an 'Until' date, but you can easily extend a sequence later if you wish (see later in this article). At this stage, you can still remove individual dates from the generated sequence date list - click the X next to a date to be removed. For example, if an otherwise 'weekly' event is not happening during the school holidays. You can also use Add date to add additional dates that fall outside the usual repeat frequency. Note that the event Times are applied to all event dates in the sequence, but the times of individual dates can be manually changed later once the event sequence is saved - the sequence integrity is not affected by a manual time change of individual dates within the sequence.

Next, set the event's Visibility. With no visibility options ticked, the event will only be visible to Calendar module Users. However, you can set the event further visible - to Show in My ChurchSuite; Show in Embed (on your website) and Show in Connect (perhaps on a device running Connect at your weekend service Information Point). You can also set events to Show in "Featured Events", which showcases the event in an embedded 'Featured Event' list on your website and in the 'Featured Events' list in the member-facing My ChurchSuite. See our related support article for further information on Managing event visibility and status.

Event Sign Up options are explained later in this article, otherwise, click Save to add the new event/sequence.

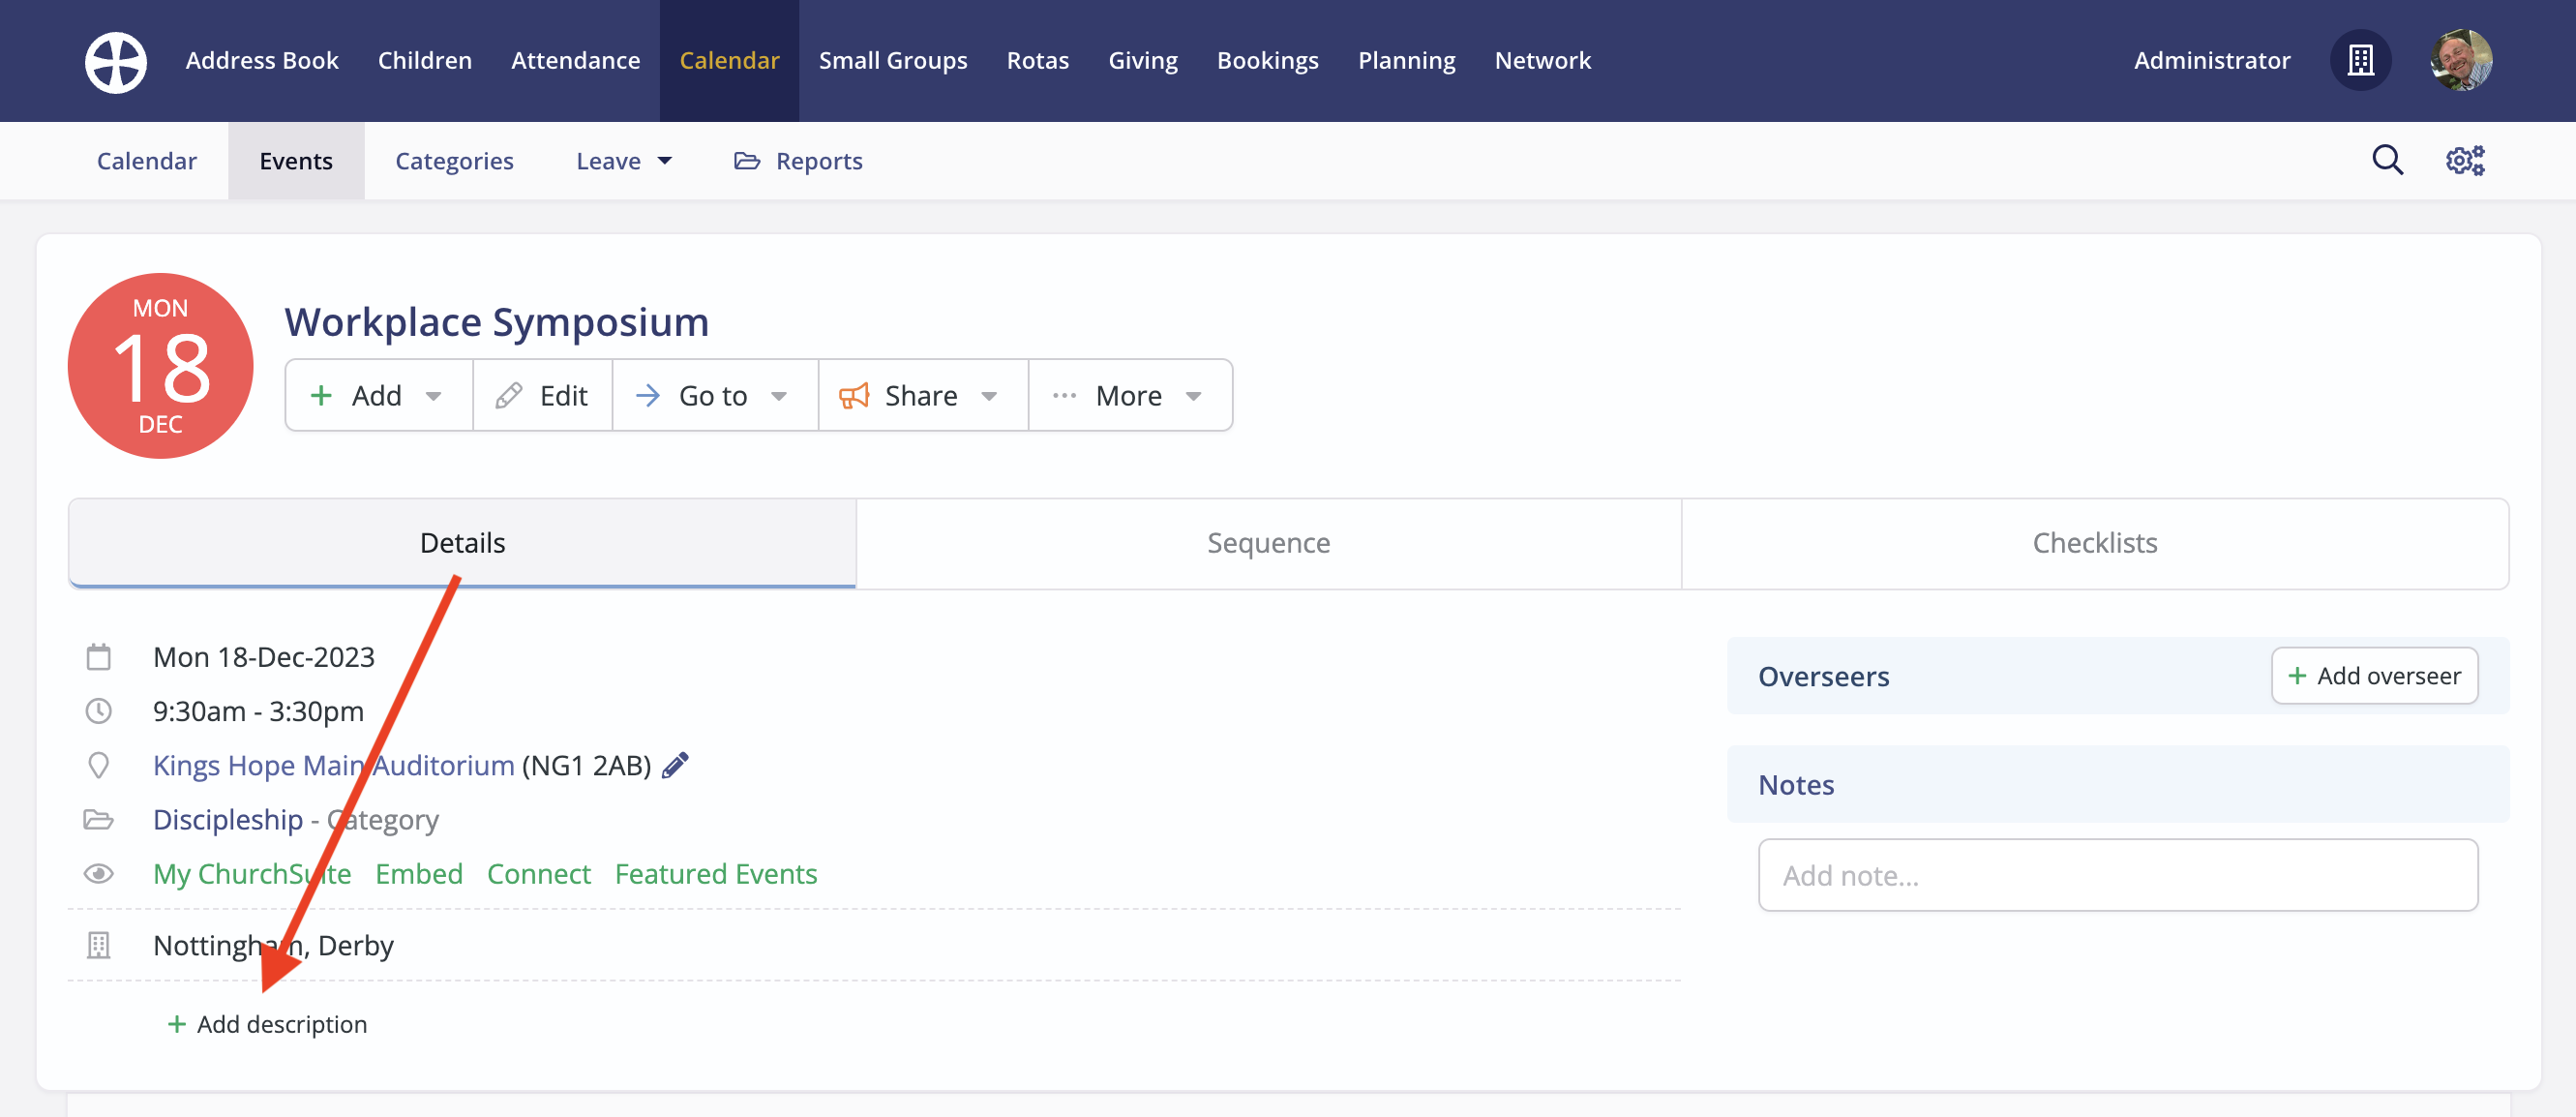
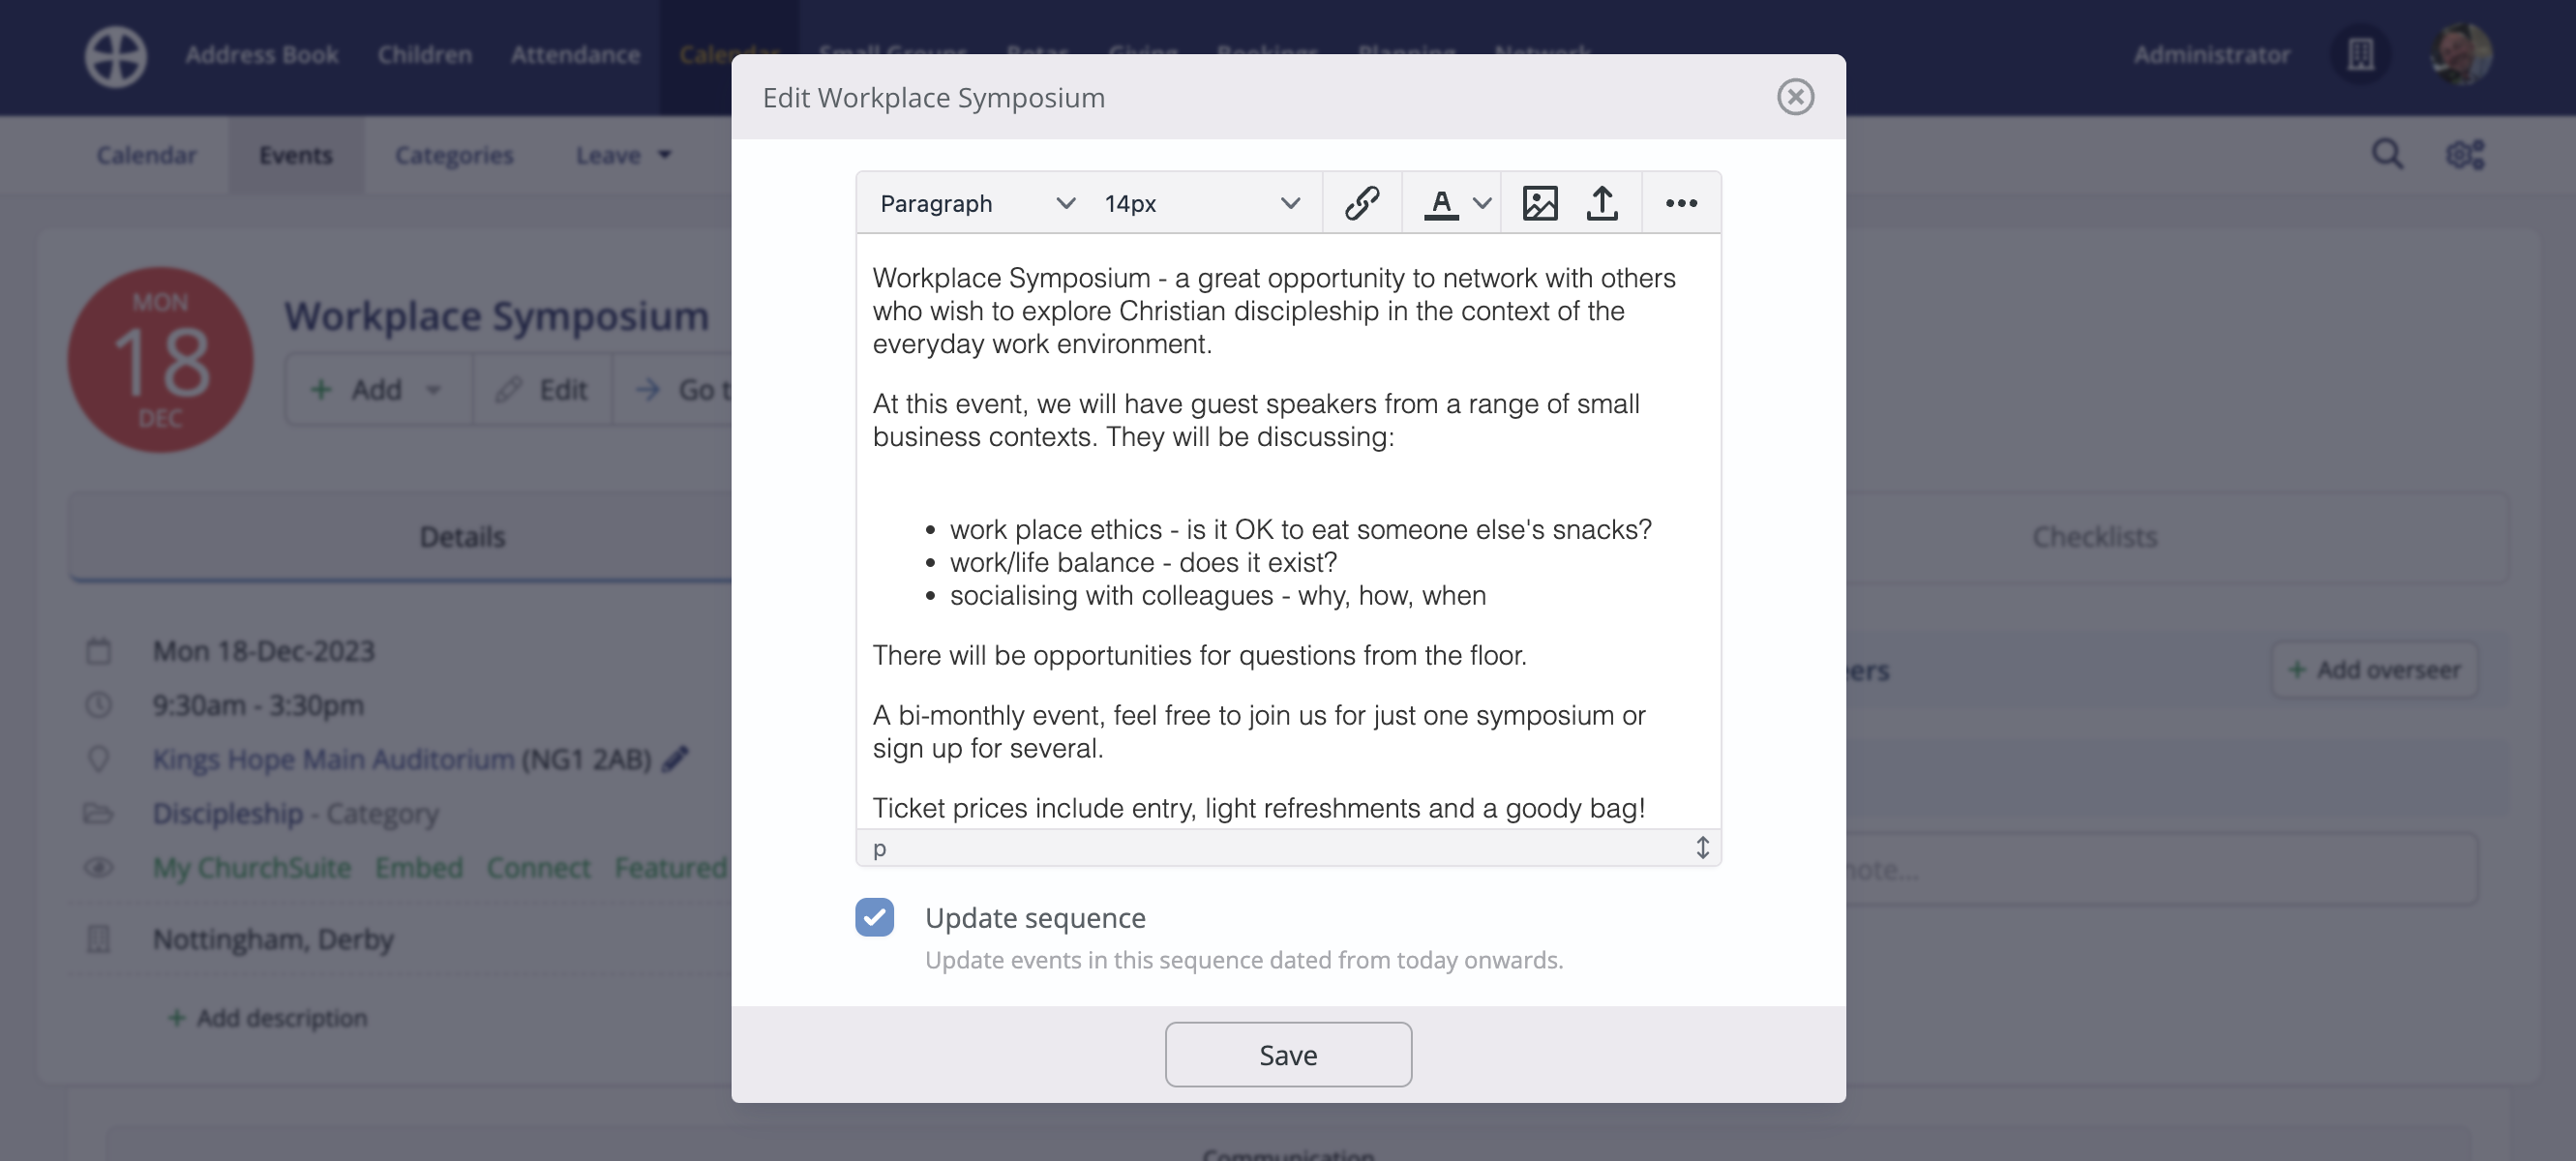
The event View is shown, summarising all the event information added. You can optionally add an informative event Description that your audience will read on the event page. Click Add description.
For sequence events, tick Update sequence to add the description to all events in the sequence.
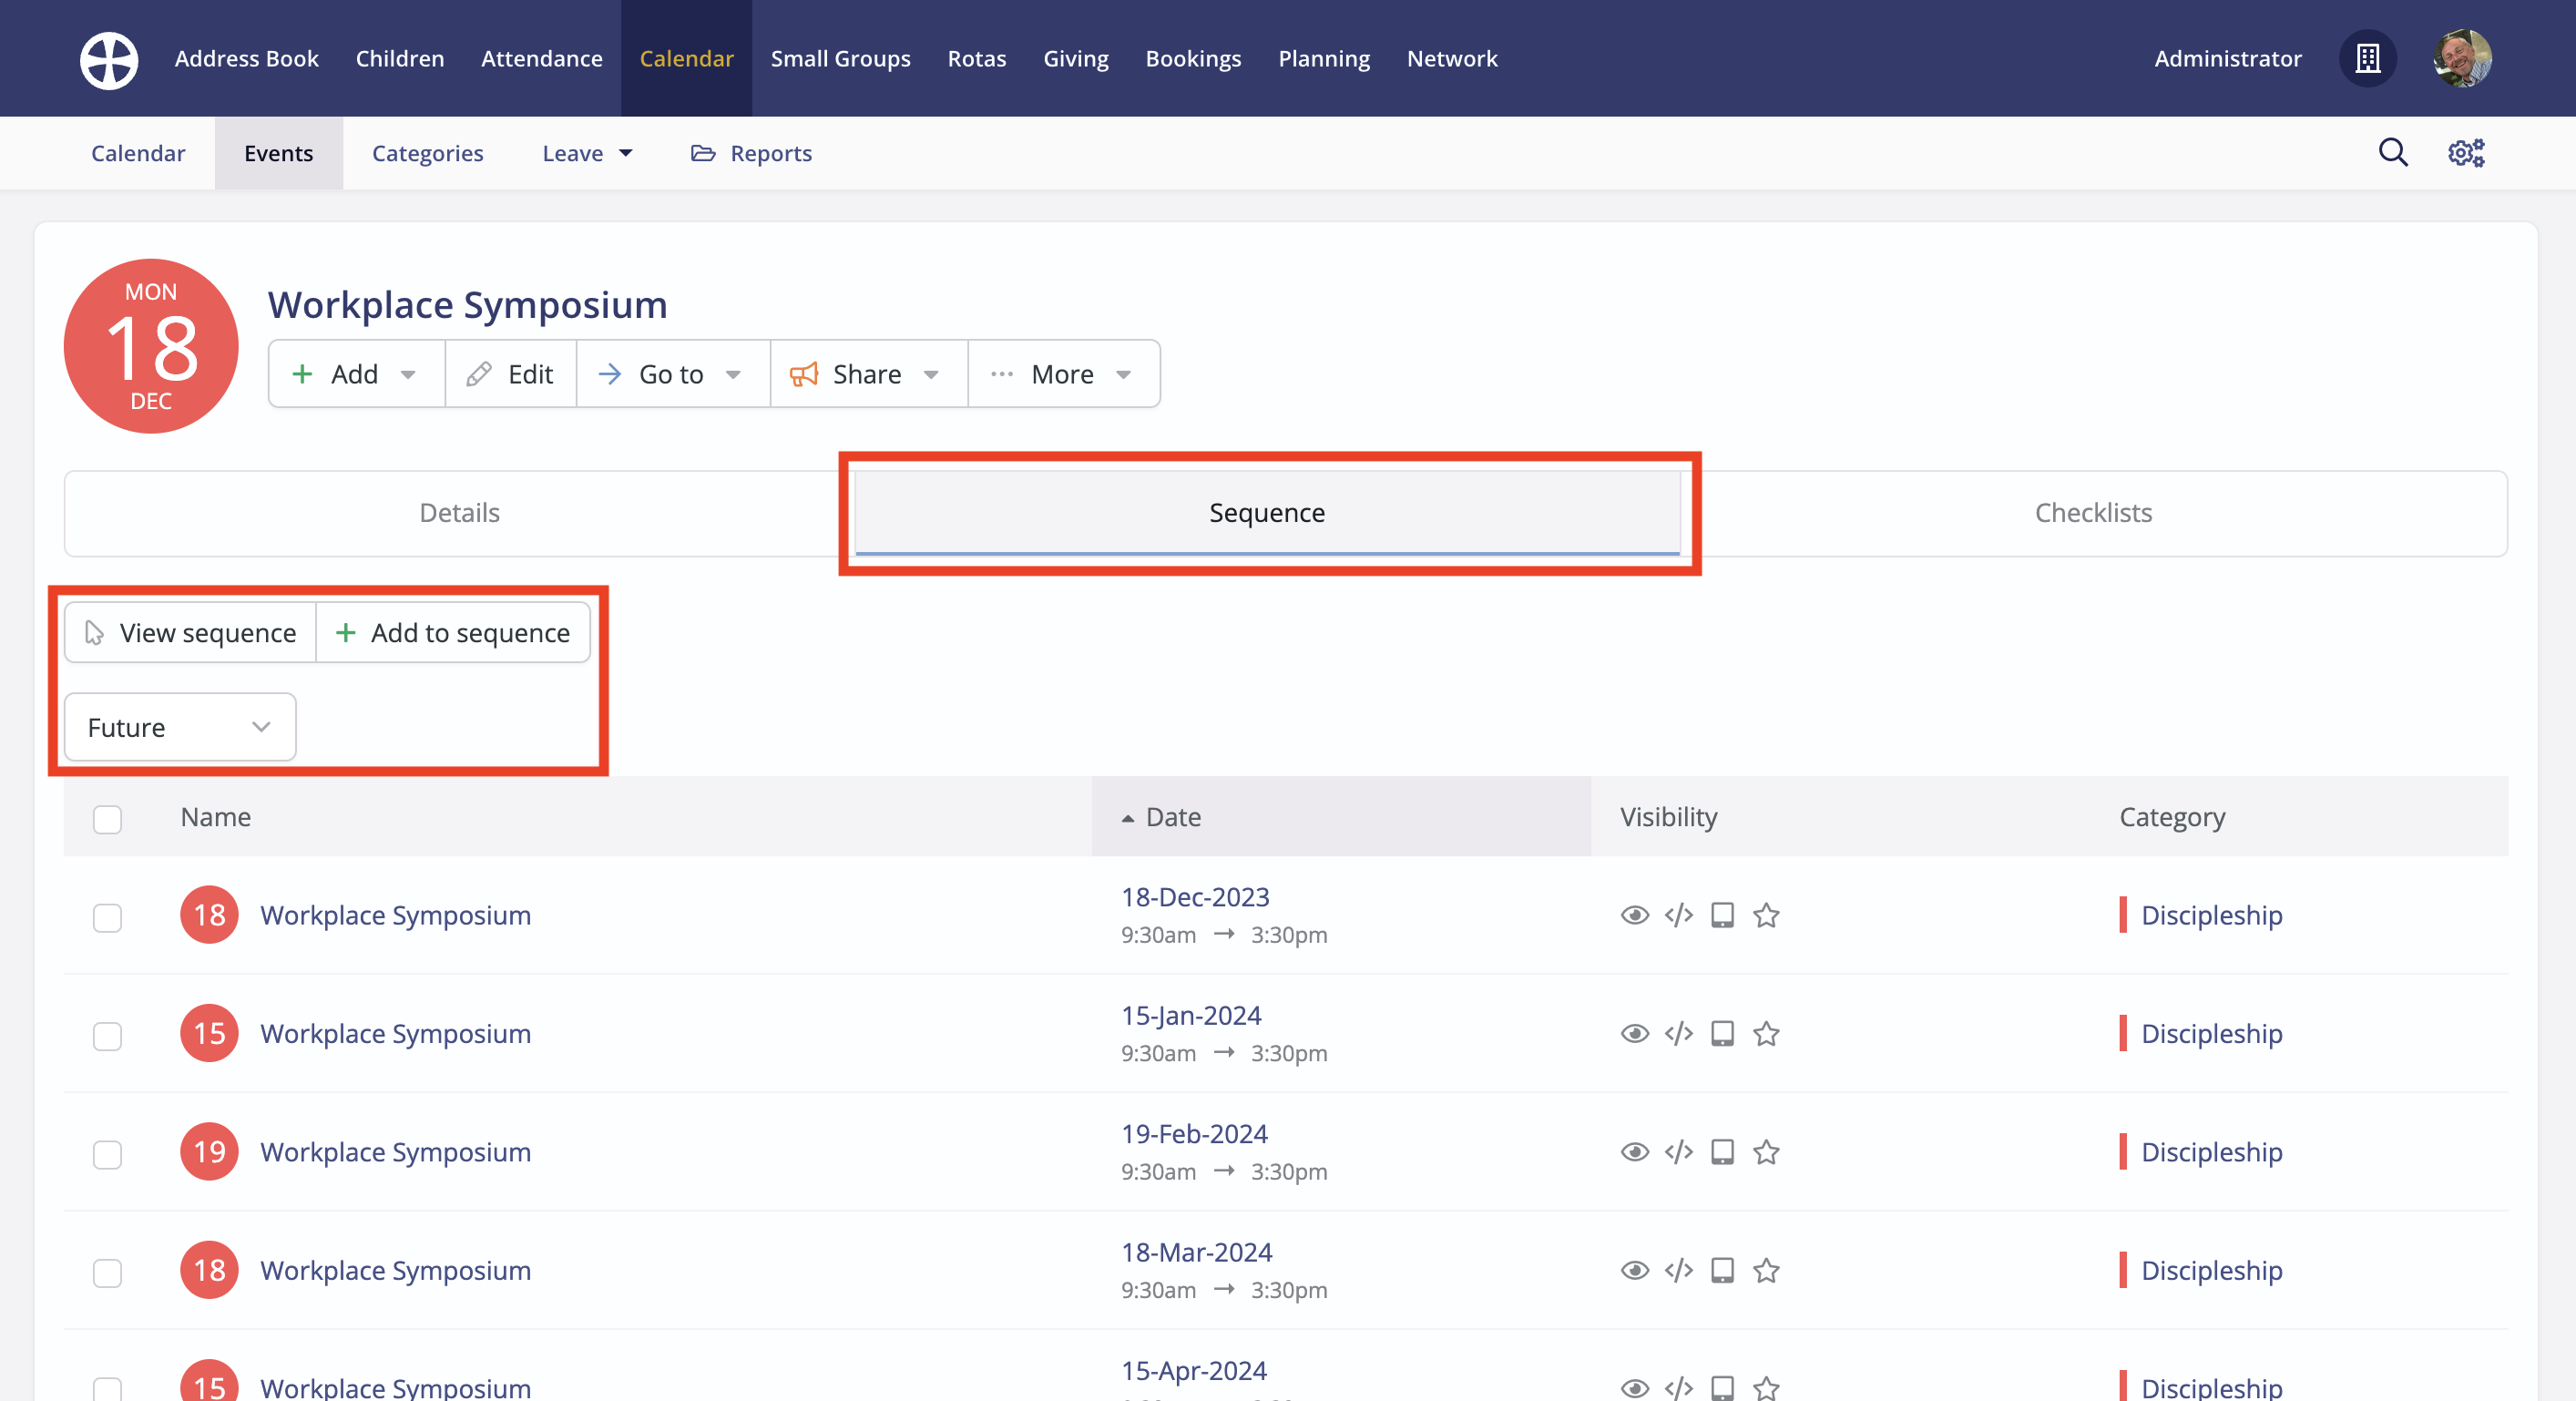
For events that repeat, note the Sequence tab providing easy access to other Future or Past dates in the same sequence. From here, select View sequence to see a filtered list of all event dates in the sequence or Add to sequence to add further dates to an existing sequence.
You can return to the event View at any time in the future to Edit event details:

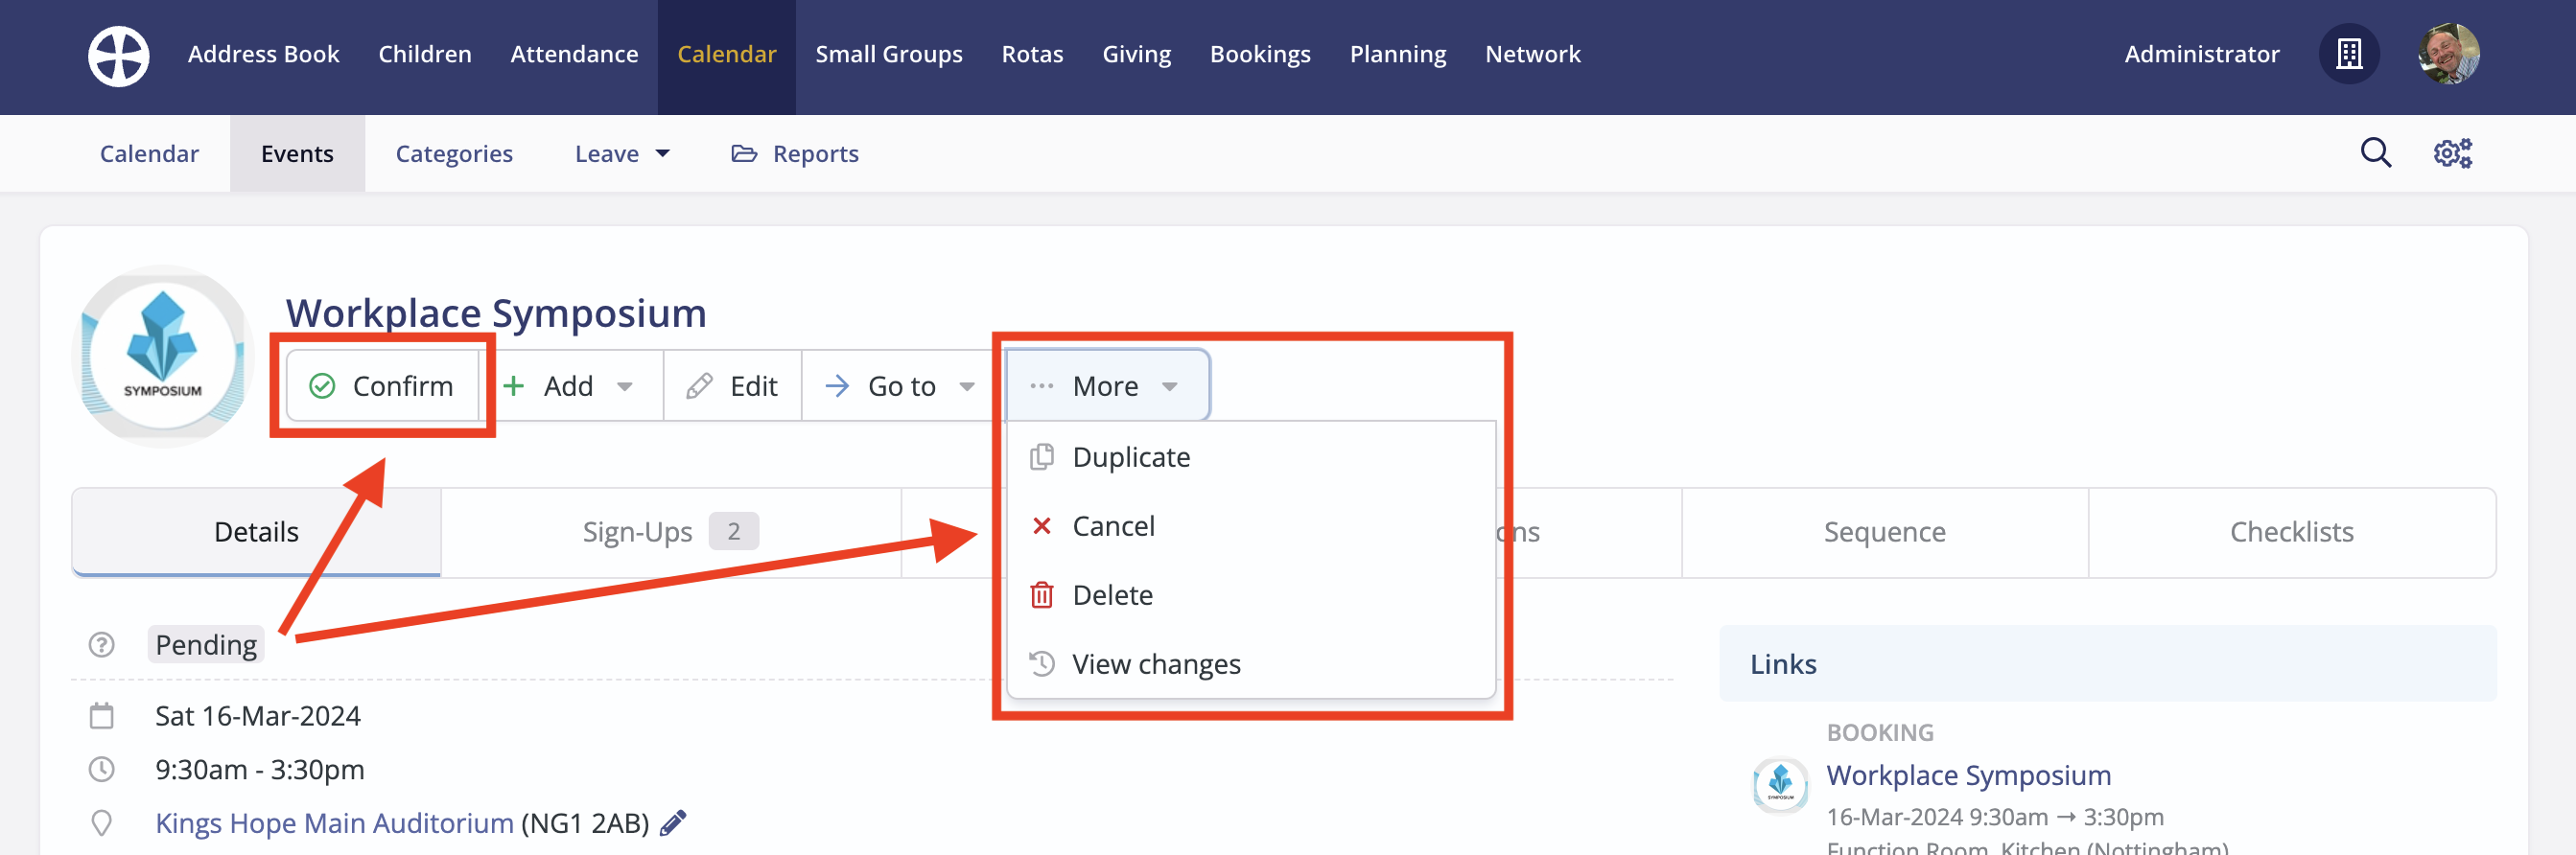
Use the event status actions to make changes to the event Status - for example, to Confirm or Cancel a Pending status event, Set as pending or Cancel a Confirmed status event, or Confirm or Set as pending a Cancelled status event.
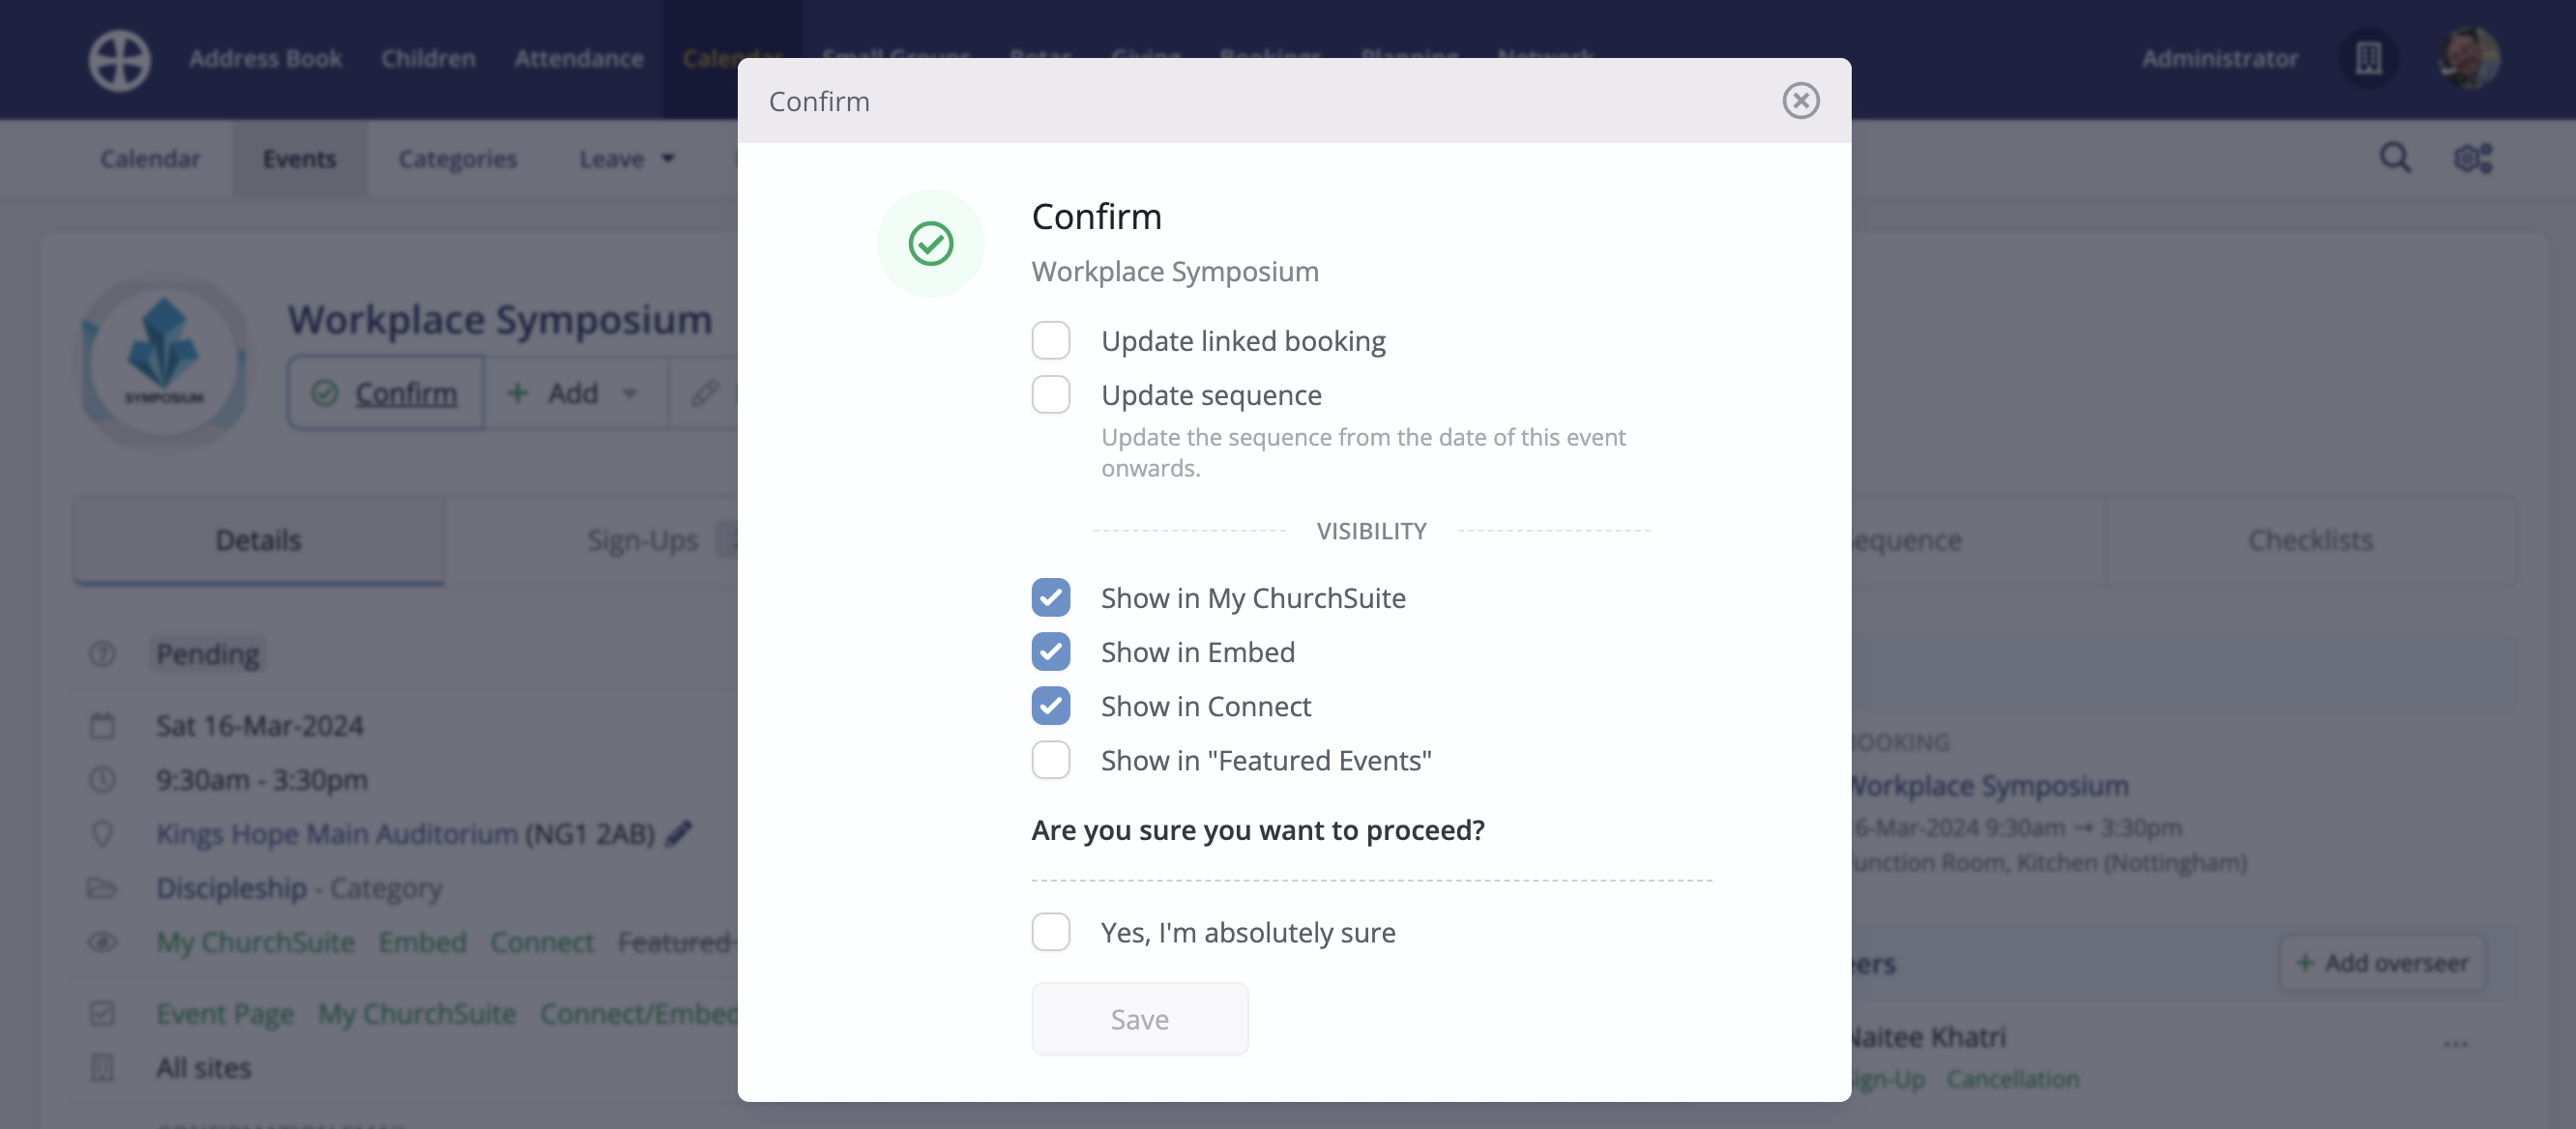
When making an event status change, note the options to apply the change to the linked booking and future dates in the same event sequence (where applicable) and to the event visibility settings:
Note that it is also possible to edit an event directly from the Calendar by navigating to the relevant date and selecting Edit from the event Actions.

When editing a sequence event, tick Update sequence to apply the changes made to all future dates in the sequence from today onwards. This setting will update the event Name, Times, Location, Site, Category, Visibility settings and Sign Up settings for all future events in the sequence from today onwards, overwriting any date-specific changes that may have already been made. Changes to an event's Start date and End date will only update the event being edited and will not change the day or dates of other events in the sequence. See the related support article for further information on working with event sequences.

Finally, note that it is also possible to add events directly to the Calendar. Hover over a calendar date where you would like to add an event and select Add event. This option is not available for mobile devices that do not have a trackpad, pointer or mouse.

Top Tip! Embedding videos
You can embed a video into an event Description, which is surfaced as a playable video on the Event Page.
When viewing a video, such as on the YouTube website, click the "Share" option on the YouTube video 'preview', and then select Copy embed code. You can also access this menu option by right-clicking on the video.

Back in ChurchSuite, click to Add or Edit your event Description, click on the action menu to surface the second row of HTML tools, and select the "Source code" tool designated by a <> icon. Paste the embed code for your video into the 'Source code" viewer, pasting it into the appropriate position within the source code view. Save the changes. Next, use the Go to event page option on the event's "View" page to preview how the video displays.

The pasted embed code will include a parameter for the video iframe width and height. So in this example...
<iframe width="640" height="360" src="https://www.youtube.com/ embed/ XMyT01kGfqA" frameborder="0" allow="autoplay; encrypted-media" allowfullscreen></iframe>
...notice the width="640" and height="360". This can be reduced to fit within the event page's available space - you may find that a width/height of 512 x 288 or 500 x 281 results in a more effective placement of the video.
Top Tip! Event defaults
You can set a Default event status assigned to new events in the Calendar module settings.

Duplicating an event
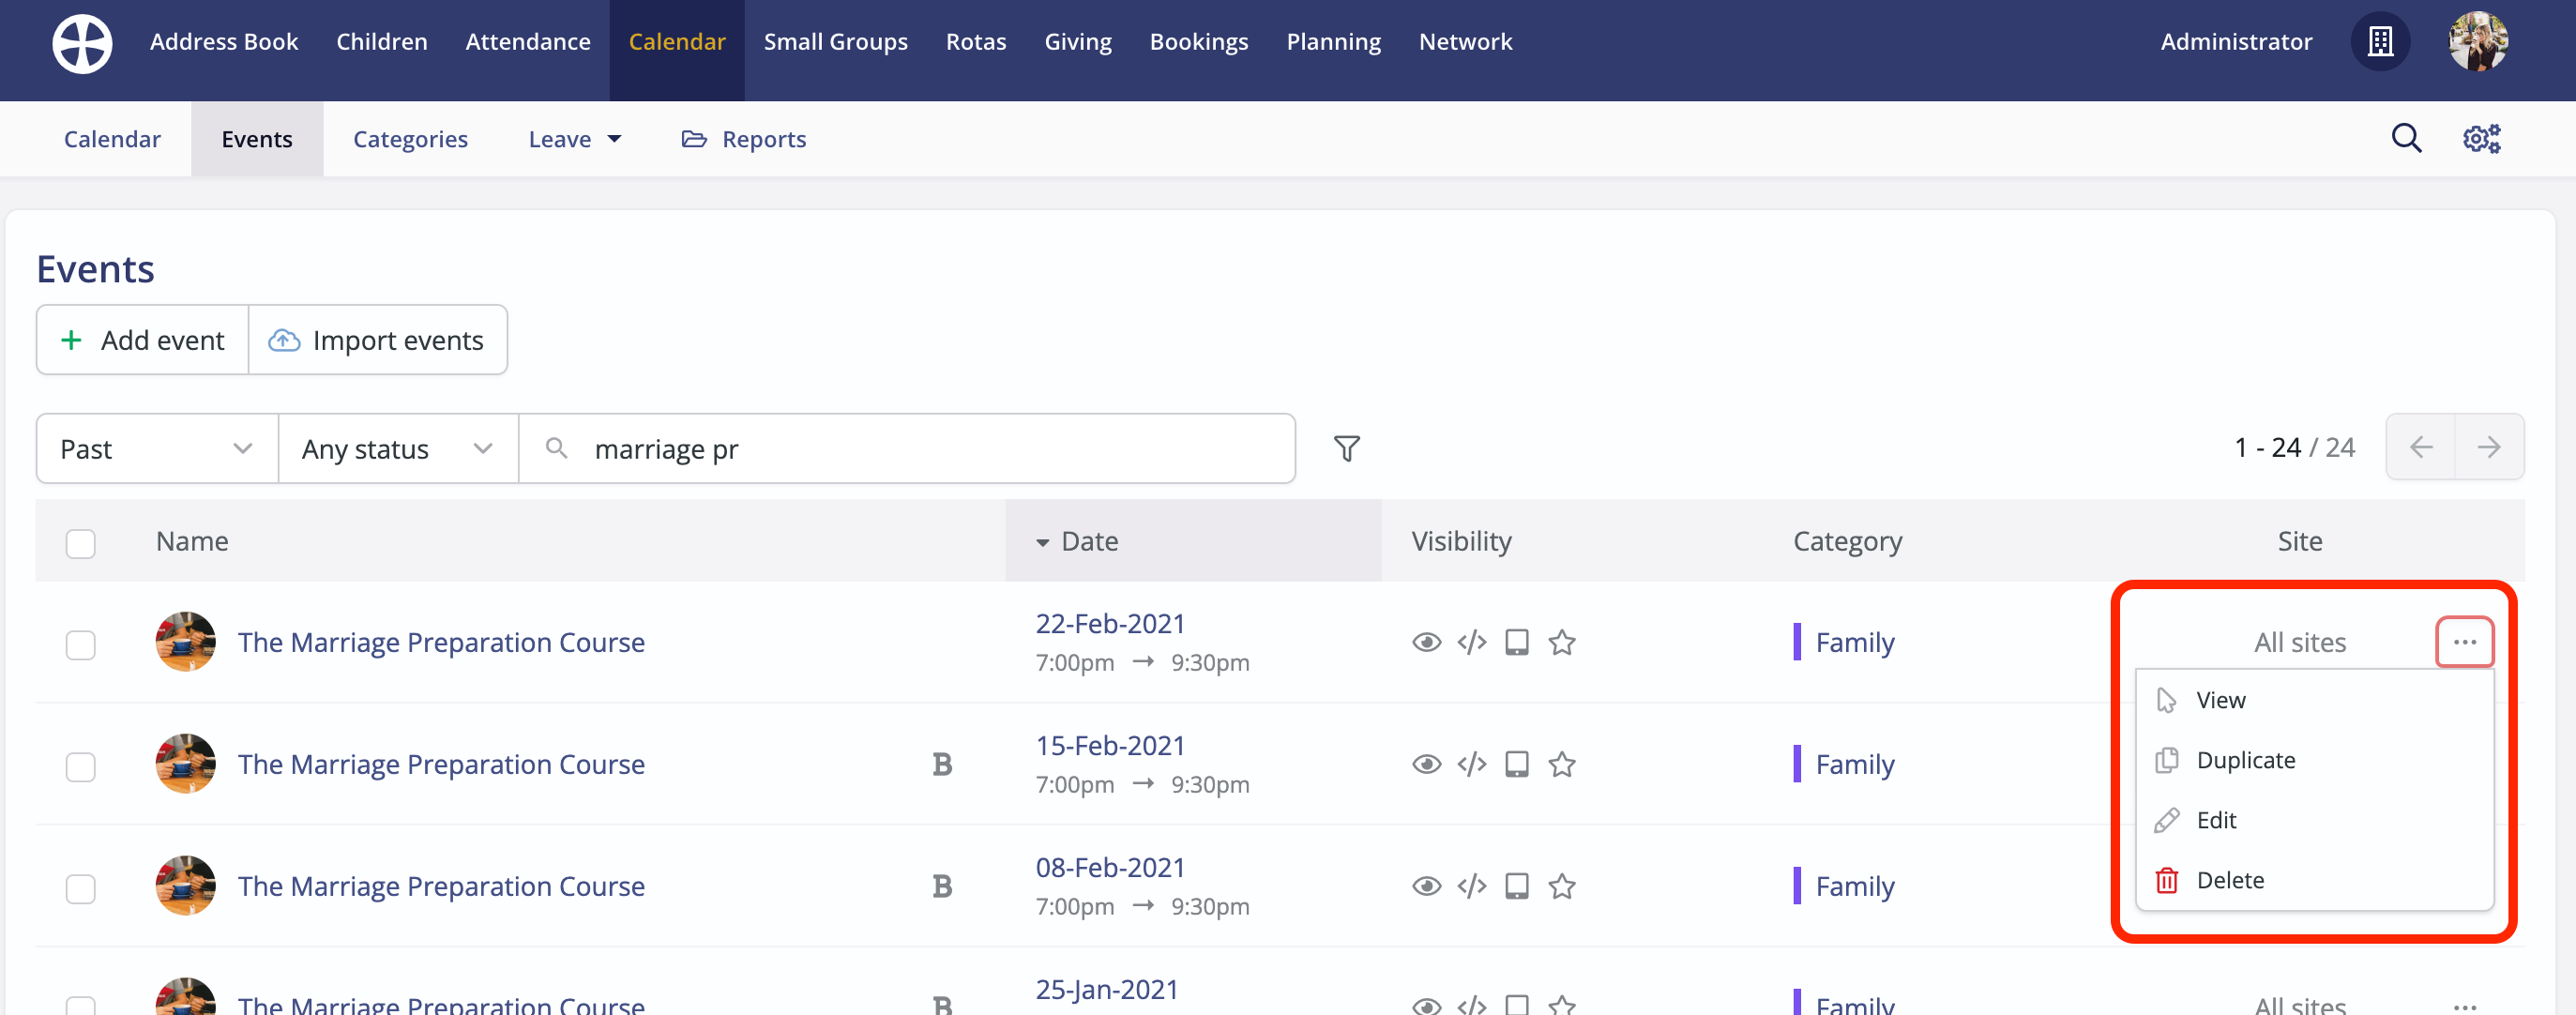
Many of your events are likely to be repeats of an event that has happened before. Rather than creating an event from the start, it may be quicker to duplicate a previous or similar event. Begin by searching for the previous event. In the Events section of the Calendar module, note the Search bar, Advanced search, Status and View filters to help you locate a previous event.

Once located, select Duplicate from the event Actions.
The same Duplicate action can be found on the event "View" page.

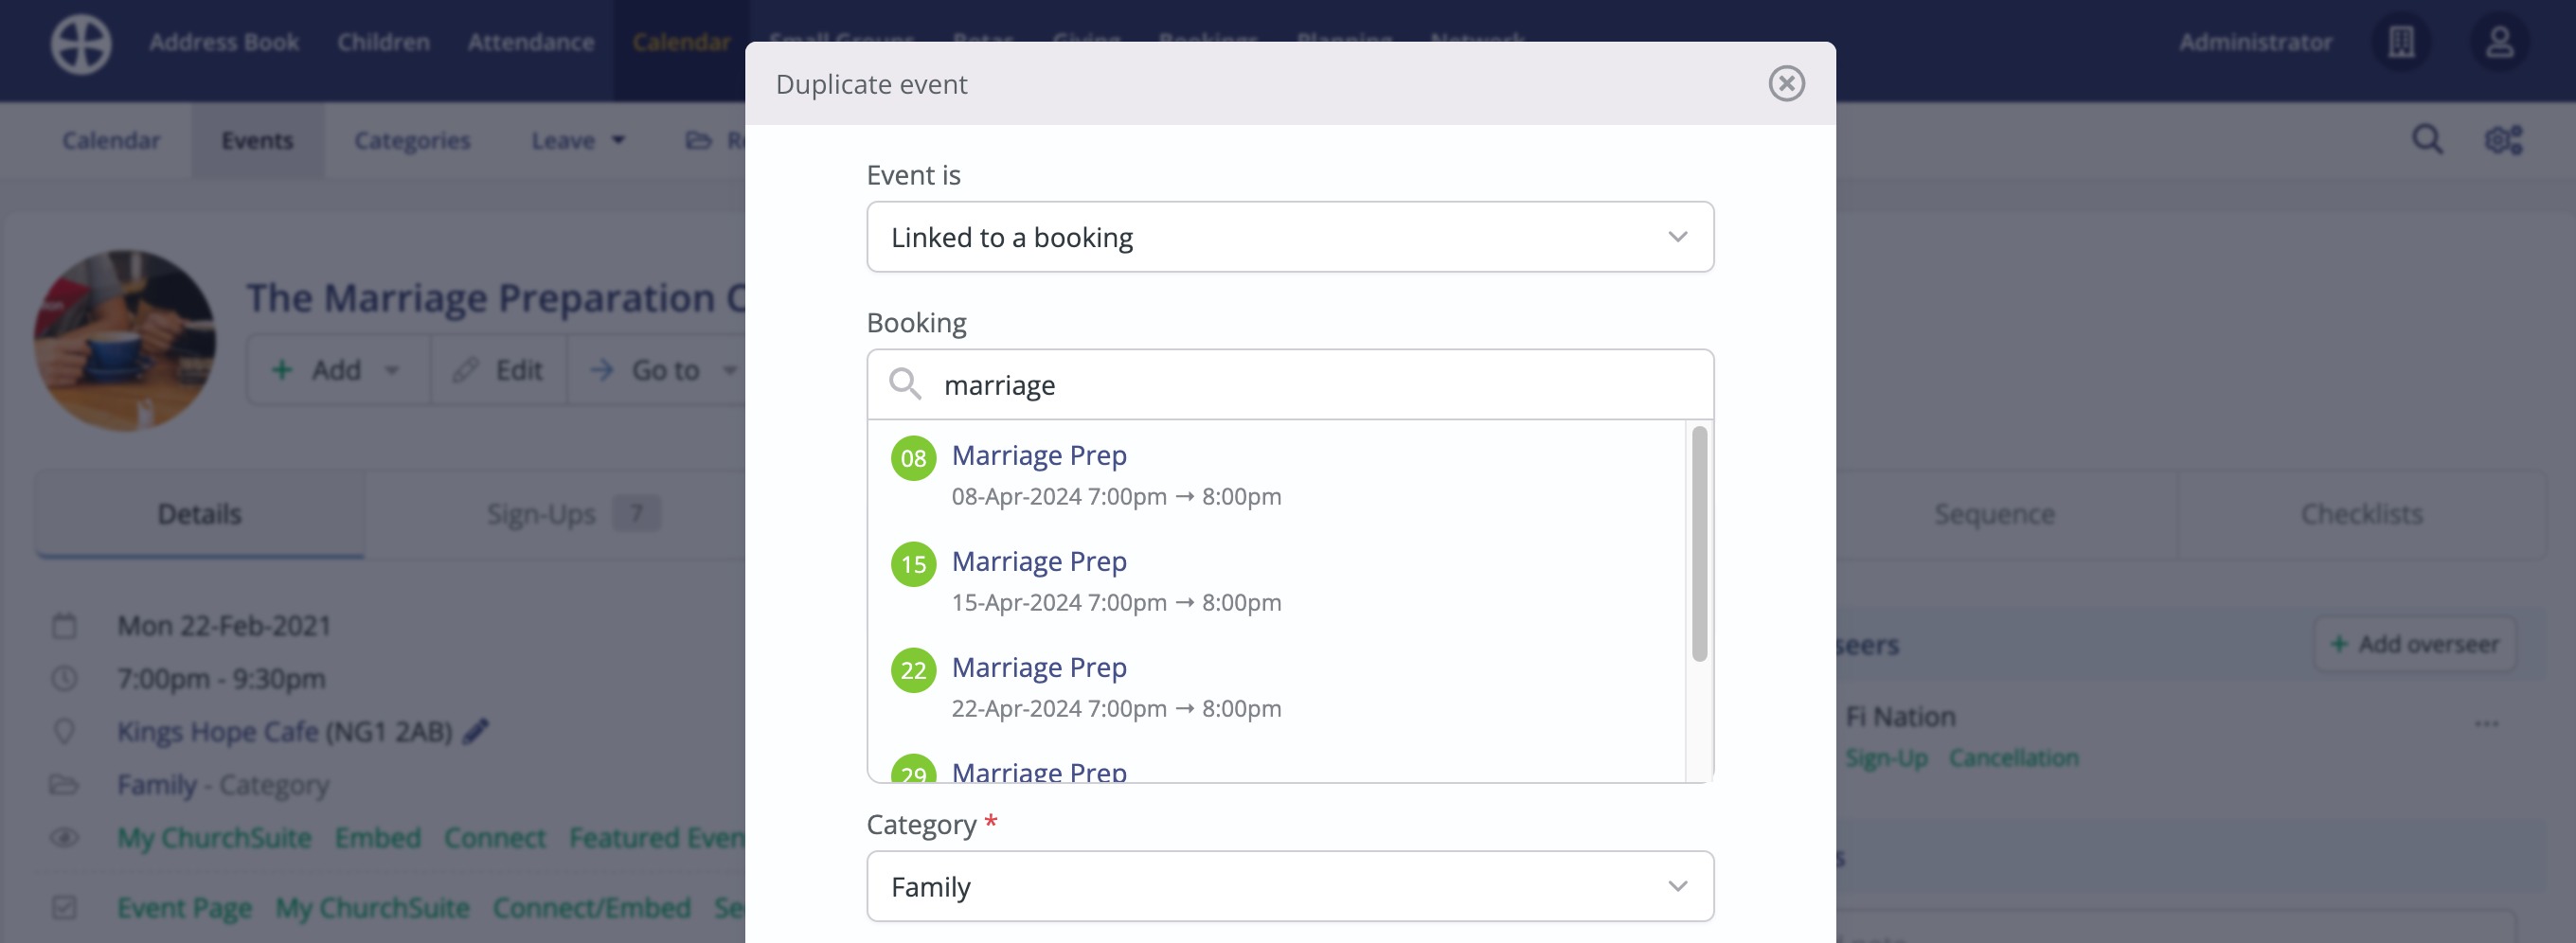
The Duplicate event pop-up opens, pre-populated with all the original event details and settings. Note that you are able to select to link the event to an existing booking, if you have one in place. The event will take on the attributes of the booing and, when linking to a booking sequence, you can select to create a matching event sequence:
If you do not have an existing booking to link to, review and update the duplicate event as appropriate, paying special attention to setting the new event Start date/time and End date/time, and also whether the event being duplicated repeats, by setting the new sequence Repeat frequency and Until date (as described earlier in this article).

Once the event details are updated, click Save to add the event/sequence. Once saved, remember to check the event Description and edit/update as appropriate.
Enabling event sign-up
ChurchSuite's event management functionality includes the option to add free, pay-online and pay-on-arrival tickets for an event. You can add multiple ticket types, giving prospective sign-ups a range of ticket options to choose from. See the related support article for further information about Adding tickets to an event.
However, it is also possible to offer a simple sign-up user experience for free events, without adding tickets, giving your prospective sign-ups a simpler form to complete. In this section, we'll look at simple sign-up for sequence and non-sequence one-pff events. We've produced a separate support article for Adding tickets to an event.

Working from the event "View" page - and continuing the earlier example - click to Edit the event.

Scroll down to the end of the Edit pop-up and locate the Sign-Up settings section. Tick Sign up through Event Page, which reveals further sign-up options. Sign-up must also be enabled if you are adding tickets to the event. With sign-up through the event page enabled, you could now choose to share the event page URL - perhaps in your email communications or social media channels. Anyone with the event page URL will be able to sign up. You can also enable further sign-up options for My ChurchSuite, and Connect/Embed and Allow sign-ups to [self] cancel their sign-up should they need to. You can optionally set an event Capacity, which is useful if you need to limit the total number of sign-ups due to venue constraints - once the event sign-up capacity is reached, no further sign-ups will be possible through the event page and an information message explains the event is full. Calendar module Users can always override the event capacity by manually adding sign-ups - see later in this article - an information message alerts users when the event capacity is exceeded.

For sequence events only, a further signup option is shown for Sign up to the sequence. This setting determines whether those signing up for the event are only signing up for a specific date within the sequence (e.g. a monthly newcomer event, where people will sign up for just one event date from the sequence), or whether they are signing up for all dates in the sequence (e.g. a weekly discipleship course, where sign-up is for the course). Remember to tick Update sequence if you wish sign-up setting changes to also be applied to all other future event dates in the sequence from today.

When Sign up to the sequence is enabled, details of sign-ups are recorded against the sequence and the same list of sign-ups is shown when viewing any event within the sequence. When Sign up to the sequence is enabled, the Event Page lists all future dates remaining in the sequence, so your potential sign-ups can easily see that they're signing up for a series of dates.

Remember to Save any changes made to the event settings. You can preview the public-facing event page at any time by selecting Go to event page.

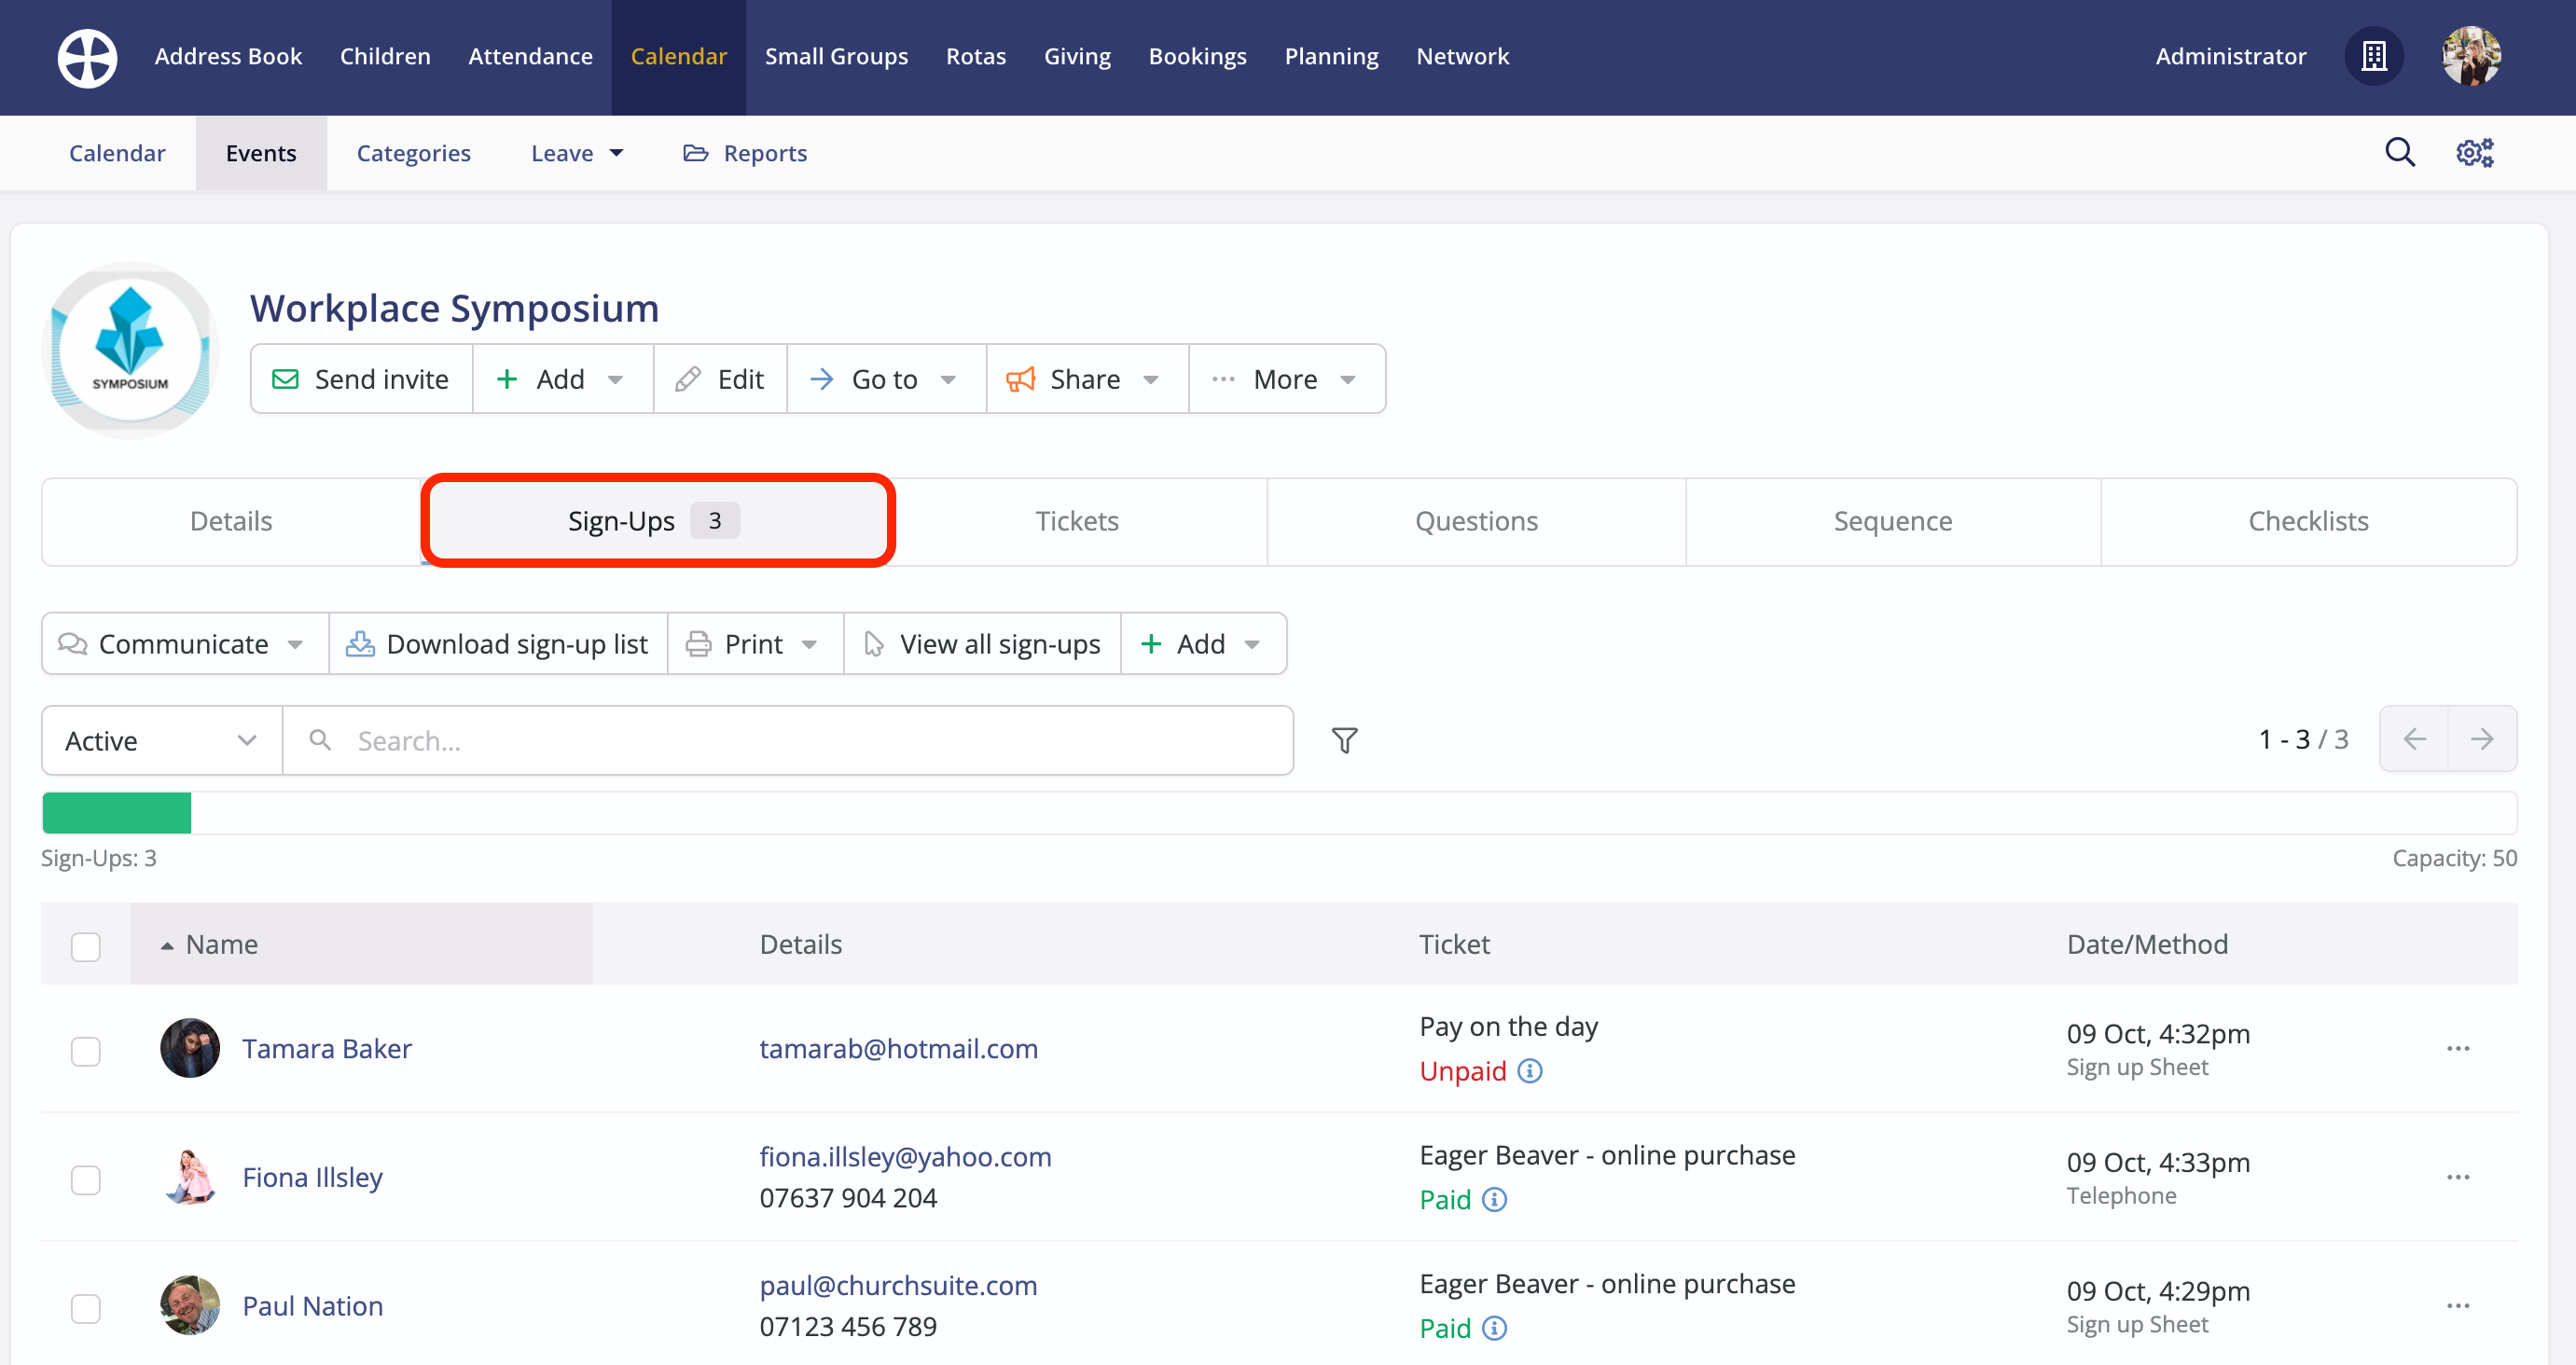
Those who have signed up are listed on the Sign-Ups tab:
Customising the event sign-up confirmation email
When people sign up for an event, a Branded Slimline confirmation email is sent to their email address, if specified. An embedded link within the email opens their sign-up page summarising all the details of their sign-up, and if enabled, the option to process a sign-up cancellation request. An example confirmation email is shown later in this section.
You can optionally add a custom confirmation message, to which the 'system-generated' email content is then appended. In this way, confirmation emails become a great opportunity to send important pre-event information that your sign-ups may need when they attend e.g. directions and car parking, your cancellation or refund policy, or maybe a message to promote another upcoming event. Here's how...
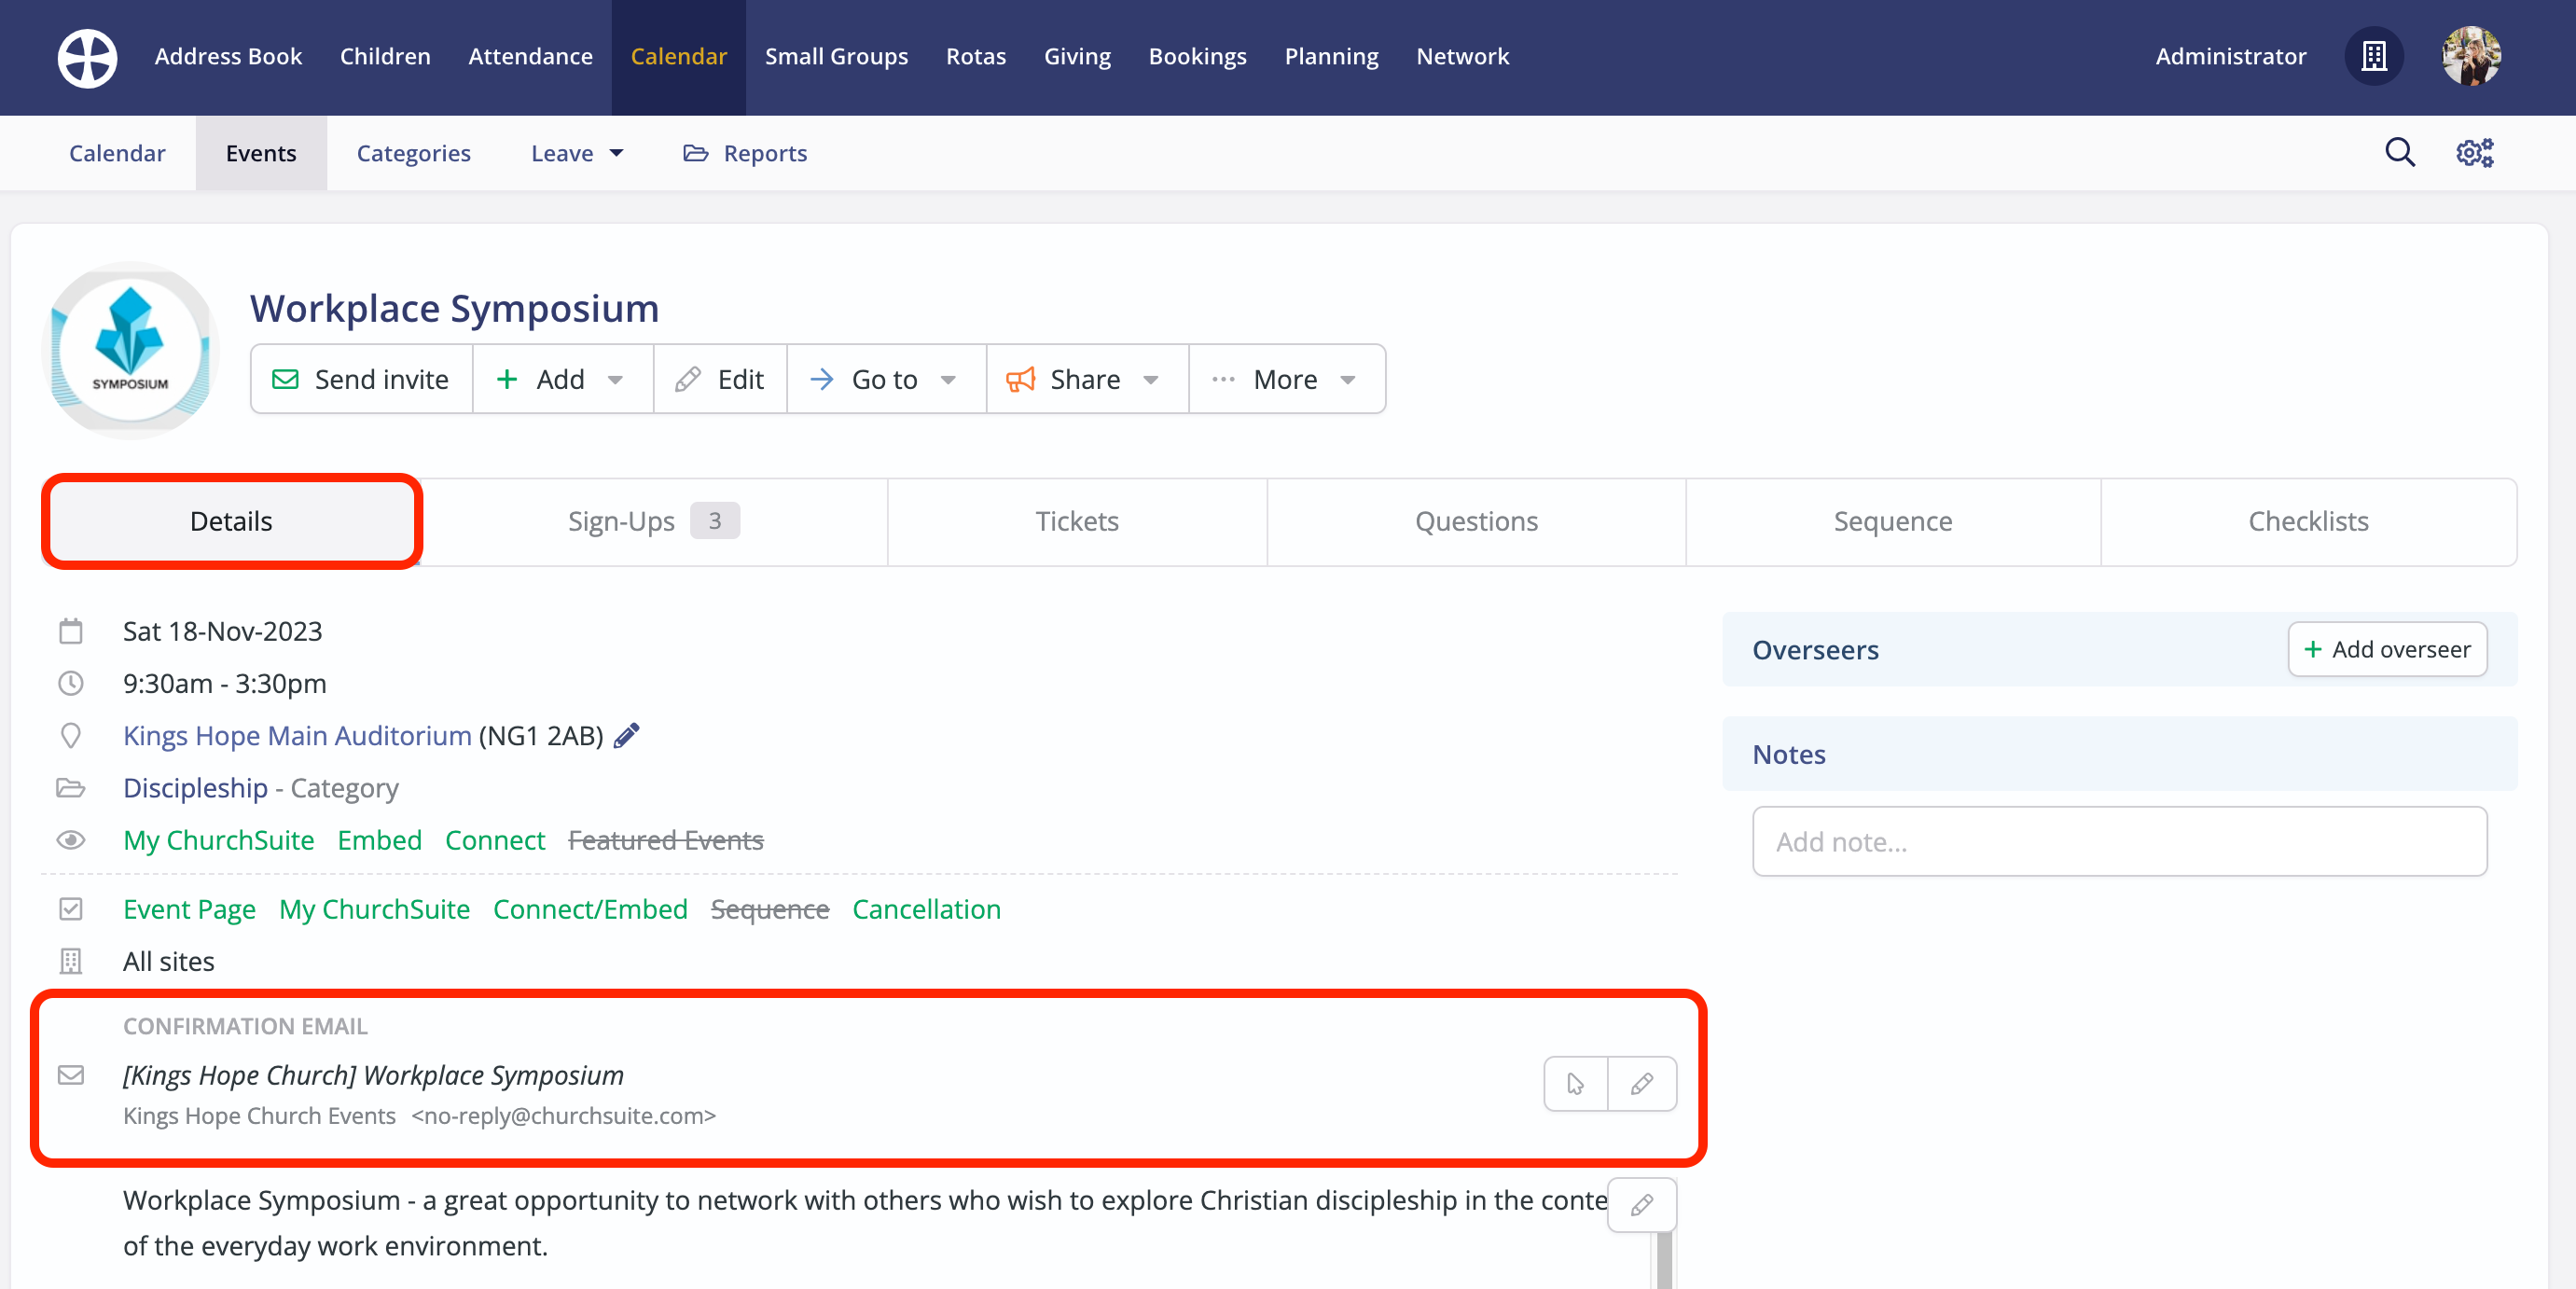
From the Details tab on the event View, click to View or Edit the Confirmation Email.
On the Edit pop-up, compose your message, perhaps optionally setting different Sender details, or choose a Preset Email (if you have already created a template for a sign-up confirmation). By using Merge Fields you can add personalisation to your message. For sequence events, click Update sequence to apply the changes to all dates in the sequence. Click Save to close the pop-up.

In the example above, we've added a simple personal message. When the confirmation email is generated and sent to the sign-up, the email will also include a unique embedded View, Cancel or Check In button - here's an example...

When the recipient clicks their View, Cancel or Check In button (shown above), their sign-up confirmation page is opened, summarising all the details originally submitted through the event page form. Where multiple people were signed up in the same batch, their sign-up details are also listed. For "Physical location" events (not "Online location" events), a personal QR code is shown, which you can scan during event check-in to record event attendance - see the related support article on Event check-in. Finally, where sign-up cancellation is enabled for the event, a Request Cancellation button is shown - see our related support article for further information about Managing event sign-up cancellations.

Assigning event overseers
Designated event overseers with My ChurchSuite access have additional functionality available in the My Events section of My ChurchSuite for the events that they oversee. Overseers can view the list of sign-ups and access the event check-in page for their event, all without requiring user access to the Calendar module.
For overseers to manage their event through My ChurchSuite, the event must be set visible in My ChurchSuite. On the event Edit pop-up, scroll down to the Visibility settings and check that Show in My ChurchSuite is ticked. You can optionally restrict event visibility in My ChurchSuite to just those in selected tags. In this way, you could set an event to only be visible to tagged event overseers, but not more widely visible to others with My ChurchSuite access.

From the list of Sign-Ups, overseers can view the name and contact details of each sign-up (subject to privacy settings) and details of tickets and sign-up question responses. In this way, lay leaders (any contact in the Address Book) can easily manage some of the administration for their events from within My ChurchSuite. Additionally, if enabled, overseers can receive sign-up and cancellation notification emails for their events.

Overseers are assigned by a Calendar module User. From the event "View" page, click Add overseer.

On the Add overseer pop-up, search and select the person you wish to designate as an Overseer - matching results filter as you type. Optionally tick Notify of sign-ups for this overseer to receive sign-up notifications. Optionally tick Notify of cancellations for this overseer to receive sign-up cancellation notifications. For sequence events, optionally tick to Update sequence to assign the overseer to all future events from today onwards. Click Save to add the new overseer.

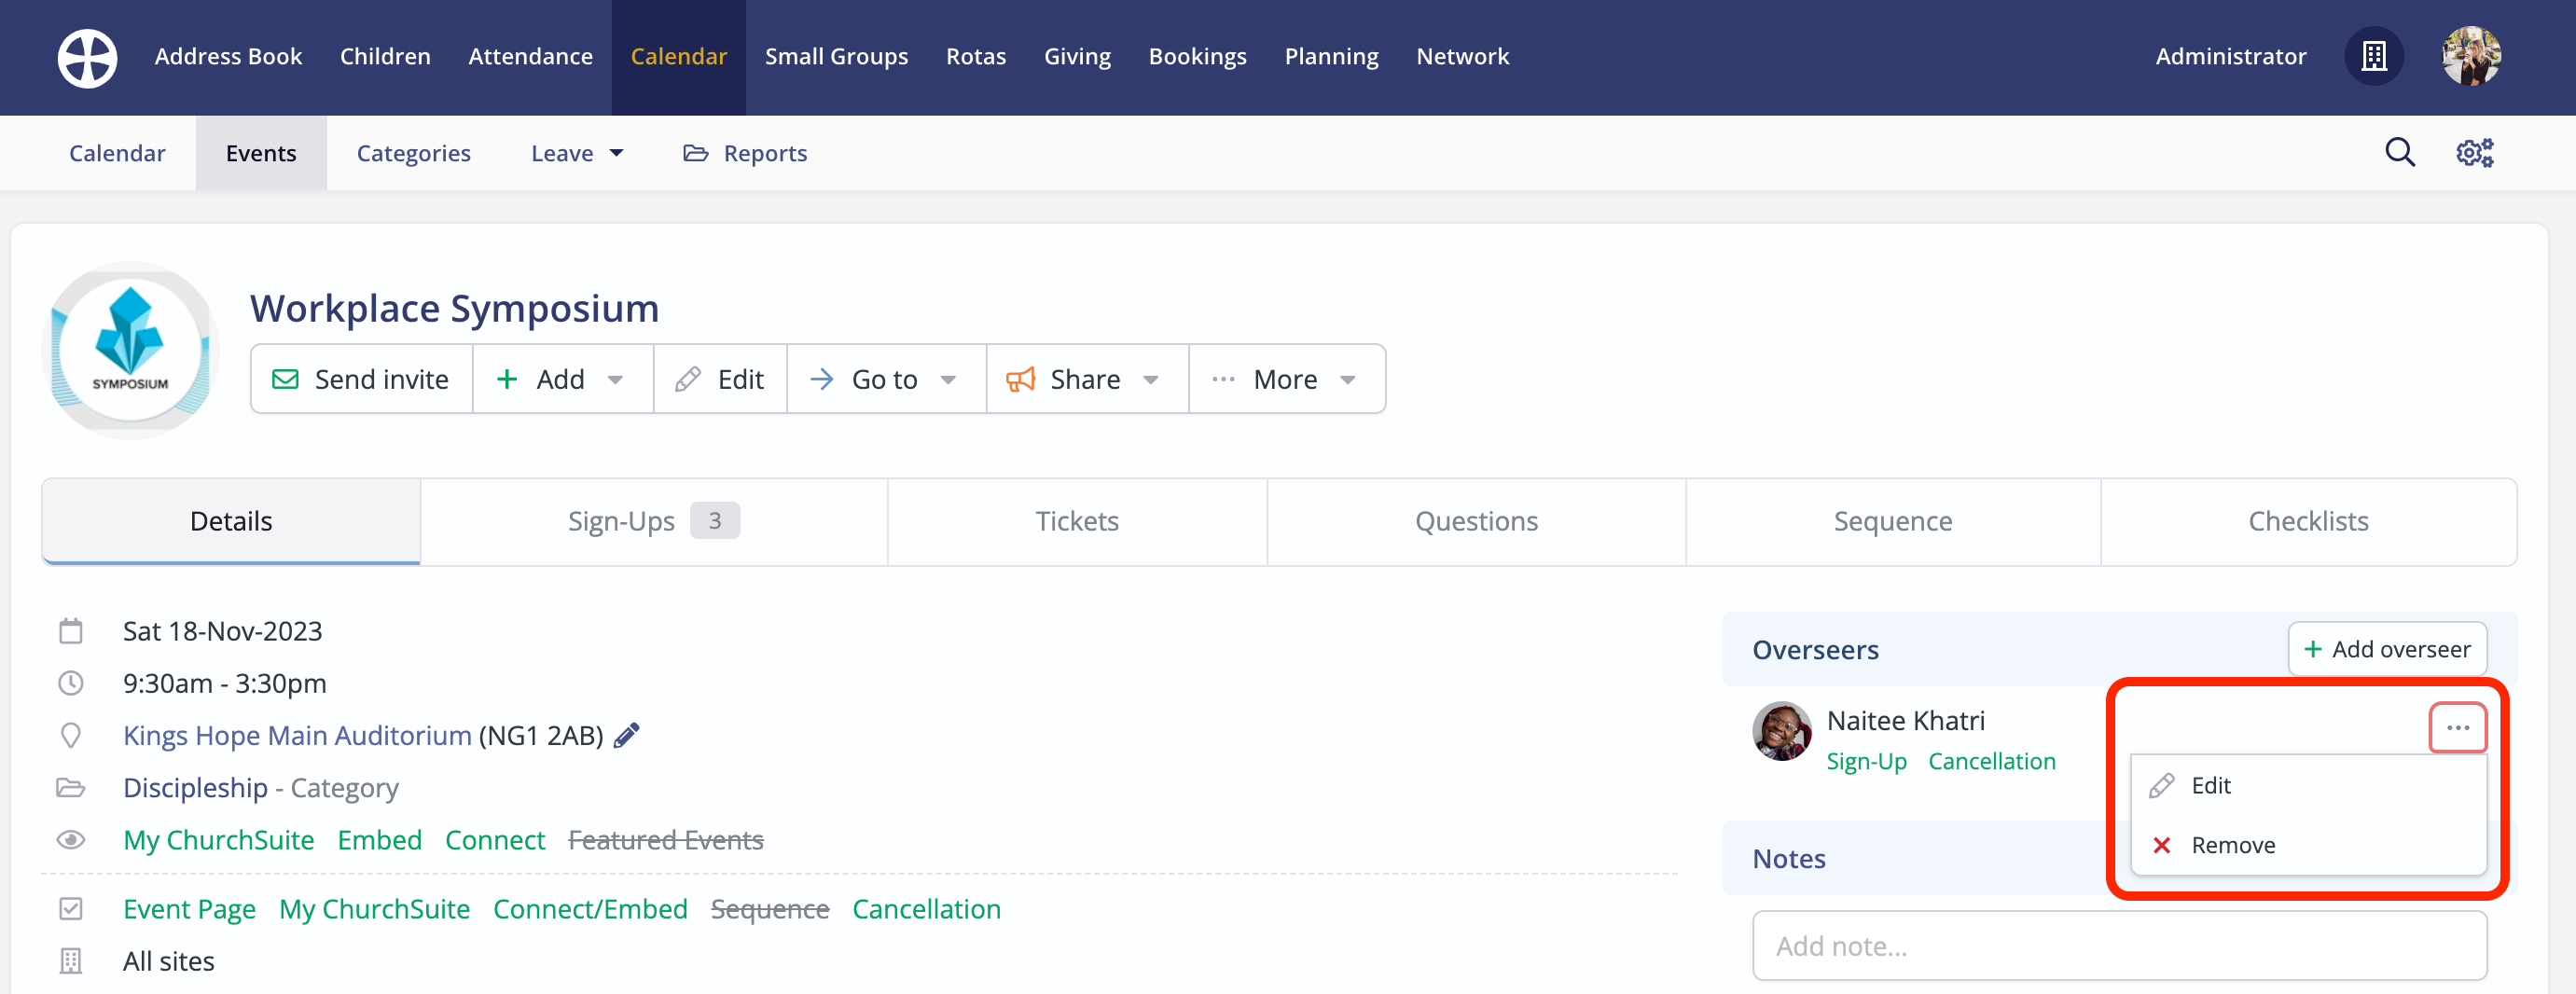
The overseer is added. You can add further overseers if you wish. Note the option to Edit or Remove an overseer - the Edit option allows you to change the overseer notification settings.
Keeping track of the changes
Change logs are maintained for all event changes made by module users, accessed by selecting View changes from the More event actions. The changes log includes the change date and time, the name of the user who made the change, and a description of the change that was made.

A useful report in the Calendar module's Reports section is the Date Added - Events report. This report lists events added to the module within a range of dates. The report results include details of each event's current Visibility settings and details of the User that added the event and when.

Finally, the Missing Data report in the Calendar module's Reports section lists all future events with missing data. Using the report's Missing Data filter you can easily identify events with missing information.

Promoting events on social media
You can easily promote your organisation's events by sharing them on popular social media like Facebook and Twitter. You can also save events to a preferred calendar app.
From an event "View" page in the Calendar module, a Share action has options to share the public-facing event page to Facebook and Twitter or to add the event to your preferred calendar apps like Outlook, Mac Calendar or Google Calendar. A QR code is also accessible for you to share within your publicity. The Share button is only shown for future-dated events.

Sharing to Facebook may require you to modify your Facebook account settings. When sharing an event page on Facebook, you may receive an error message like this...

To resolve this, log in to Facebook and navigate to your "Apps" settings and enable "Apps, Websites and Plug-ins". Then try sharing your event or group on Facebook again.

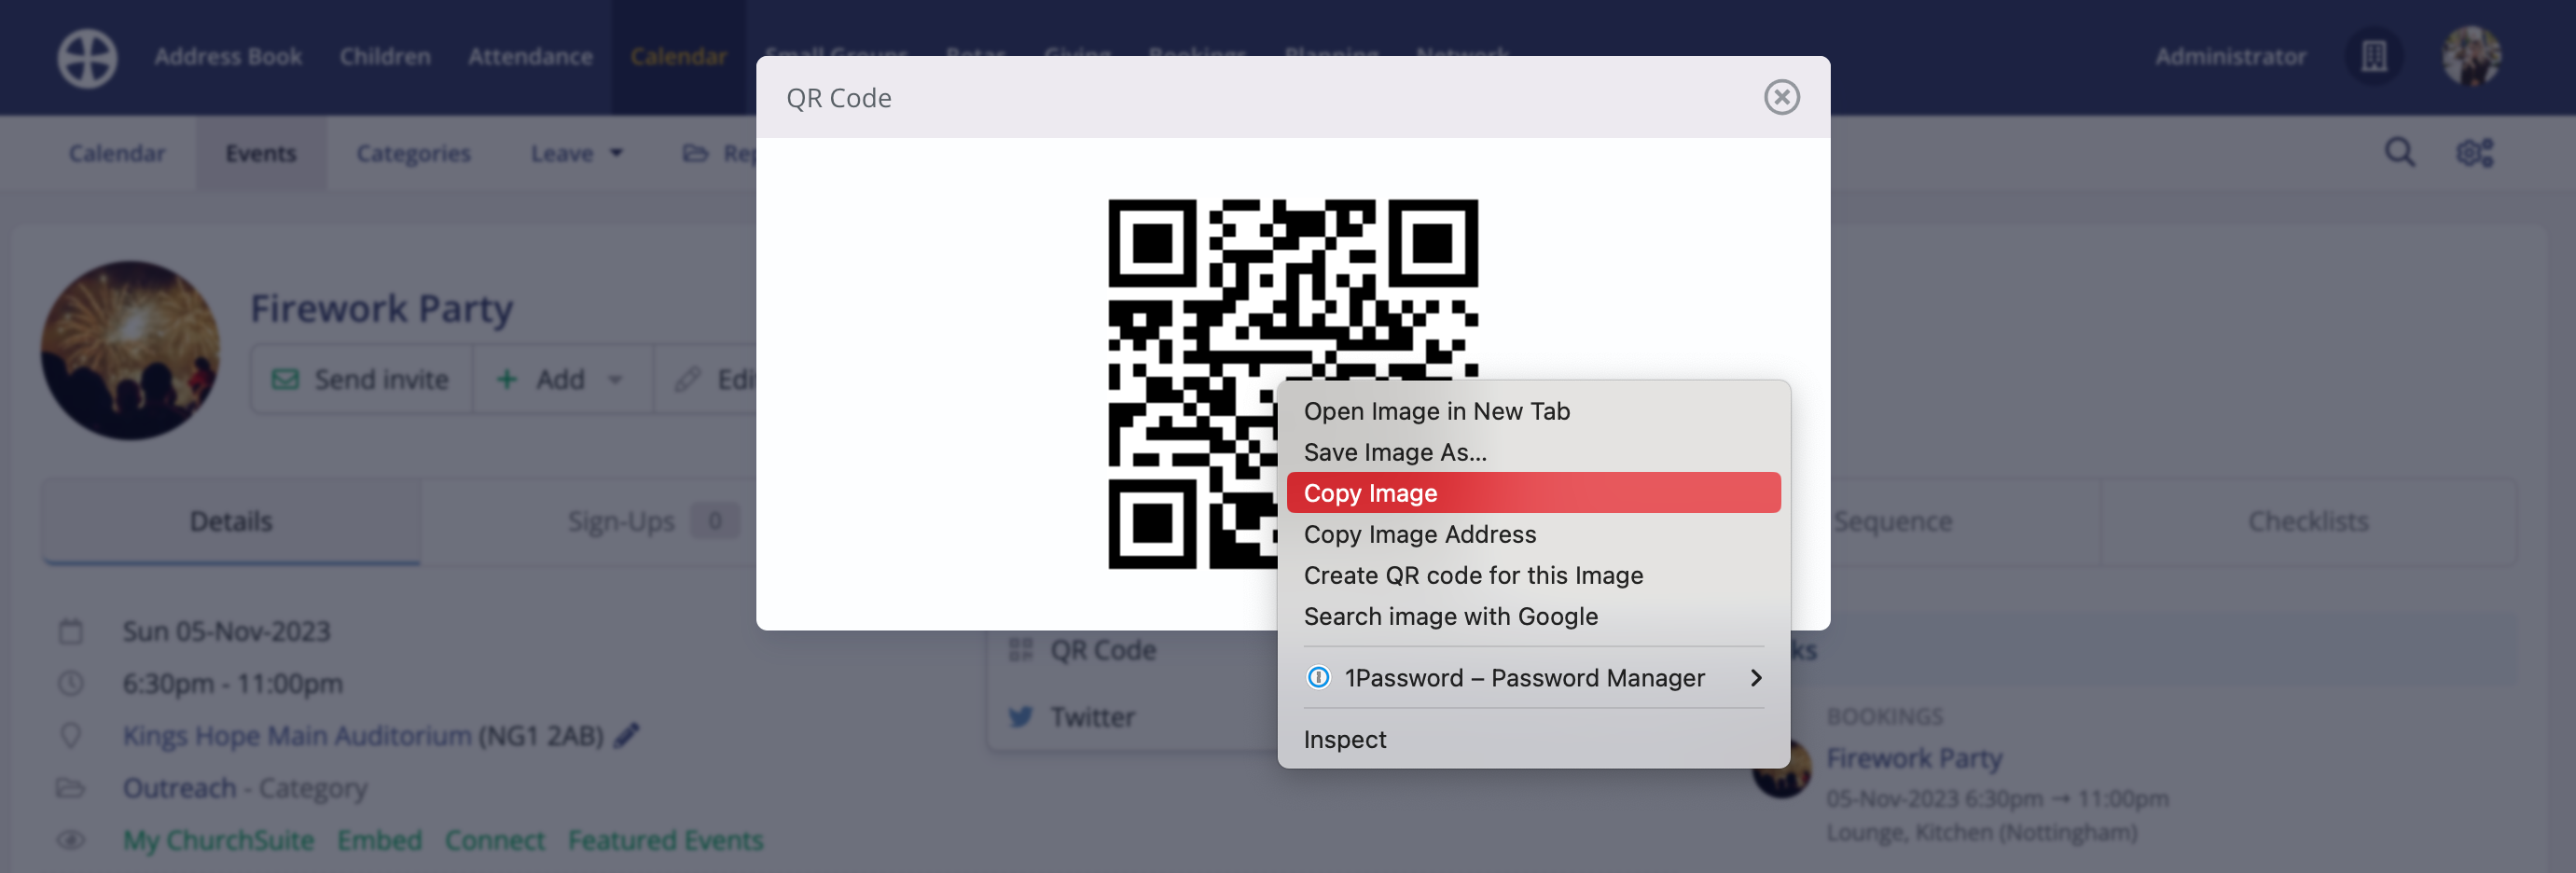
Top Tip! Using a QR Code
QR codes allow your potential sign-ups to head straight to the event page from their device, simply by scanning it with their camera. You can add the QR code to your Sunday Service notice slides, paste them into your weekly email to your contacts, add them to printed publicity, and use them on your Facebook page or Twitter feed - the possibilities are (almost) endless!
All you need to do is copy the image or save it to your own device - right-click on the image to access the options:
For future-dated events that have visibility settings enabled for Show in My ChurchSuite (without any Tag restrictions), Show in Embed or Show in Connect, the Event Page includes social media "share" icons, so that those accessing the page can also promote your events on their social media feeds if they wish. They can also add events to their preferred calendar apps like Outlook, Mac Calendar or Google Calendar.

Communicating with event sign-ups
An essential aspect of effective event management is timely communication, both before the event - perhaps to pre-welcome people and let them know any last-minute information - but also after the event - perhaps to thank people for coming or to communicate their next steps or your other events. Even within a list of sign-ups, it's often the case that you want to selectively communicate with certain groupings of people within the list - for example, just those who signed up in the last week, just those who signed up but didn't attend, just those who signed up for a particular ticket type, just those with a particular sign-up question response, or just those who haven't paid! All of these, and more, are possible using the selective Communicate options for events.
Begin by navigating to the event View "View". Depending on the event settings, you may see tabs for Sign-Ups, Invites and Check-Ins (and additional tabs for Tickets, event Questions, Sequence details and Checklists).

On the Sign-Ups tab, click Communicate and choose to Send email or Send SMS to communicate with the sign-ups listed.

Switch between viewing Active or Cancelled sign-ups or optionally use the Advanced search to further filter the list of sign-ups.

The Send email (and Send SMS) pop-up reflects the selected filters you have applied to the list. By default, and if no filters are selected, all active sign-ups will be recipients. You can optionally apply further filters on the pop-up as appropriate - perhaps just those with a particular Sign-Up Status, Tickets or Ticket Status; those with particular Question responses, and those who Signed up between a range of dates.
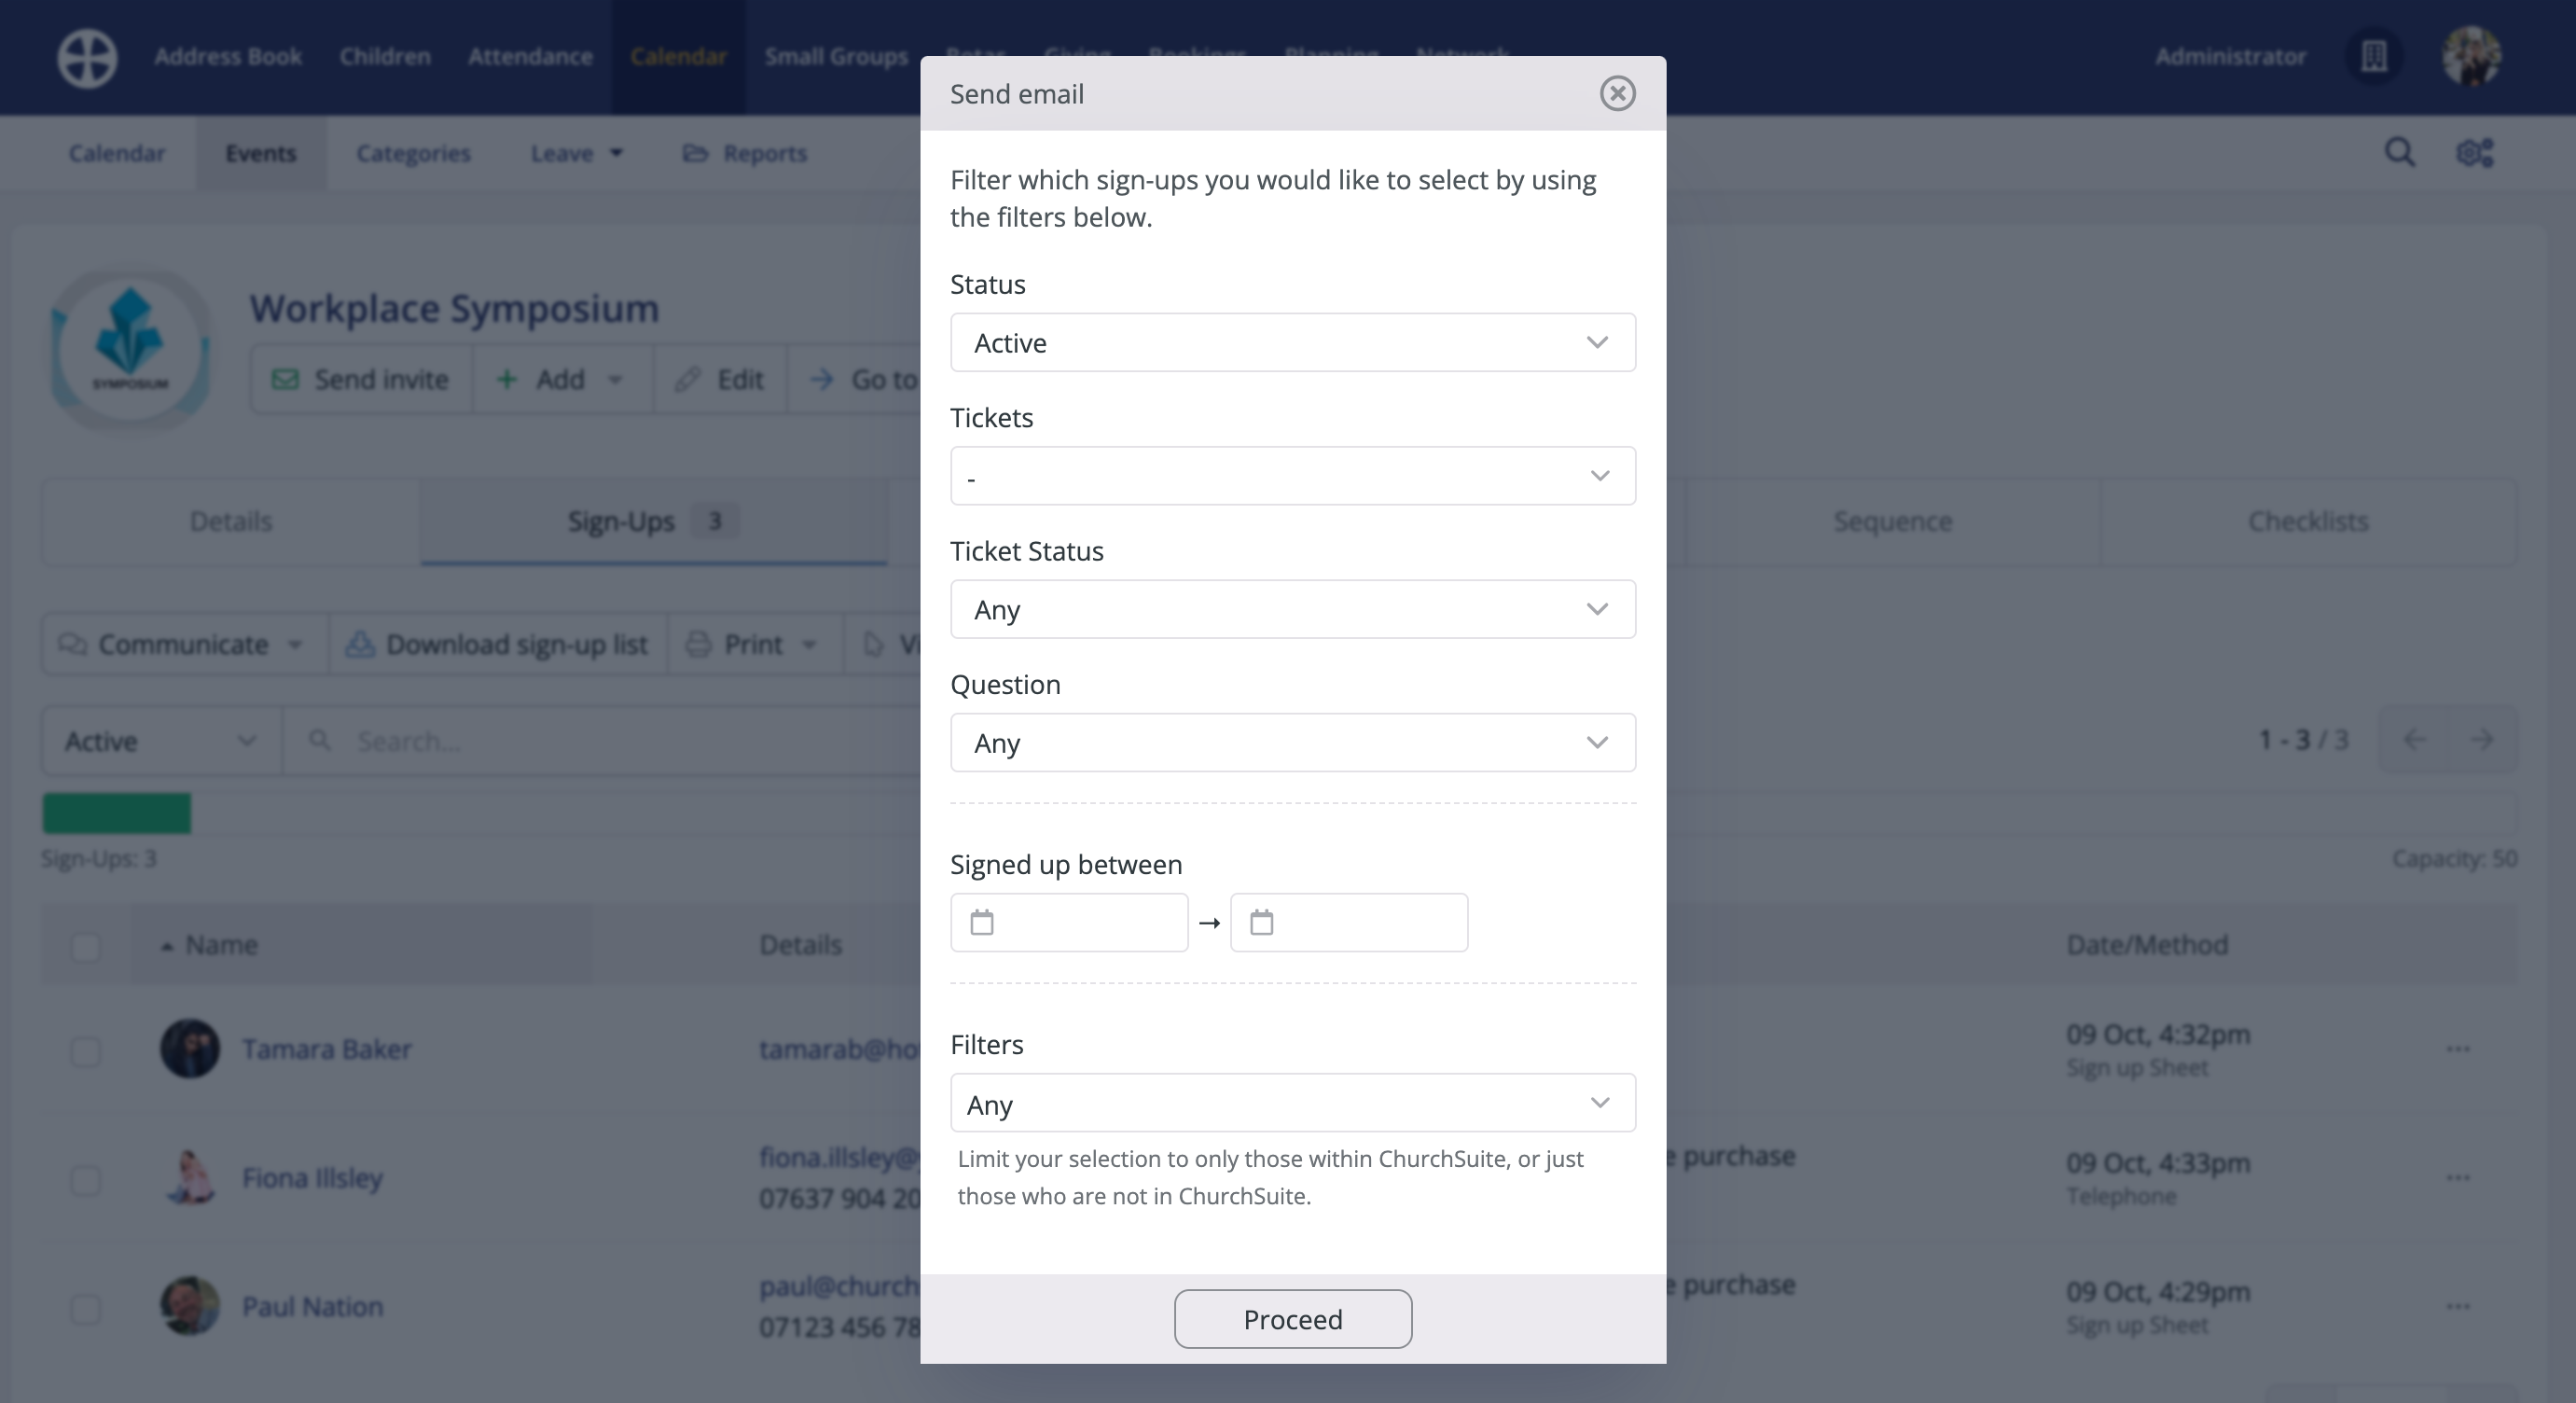
Having selected the appropriate filters, click Proceed to compose your email or SMS in the usual manner. Once you have composed your message, the message Preview populates with the filtered list of recipients, ready to send.
Event communication logging
All sent event communications are logged in the Communication section at the bottom of the event "View" page and also against the linked recipient contacts and children, visible on their respective profile pages.
